Upgrade Instructions for the BayStack 100-series Version D Boot Firmware 4401 Great America Parkway Santa Clara, CA 95054 8 Federal Street Billerica, MA 01821 Part No.
4401 Great America Parkway Santa Clara, CA 95054 8 Federal Street Billerica, MA 01821 © 1996 by Bay Networks, Inc. All rights reserved. Trademarks Bay Networks, BayStack, and SmartSwap are trademarks of Bay Networks, Inc. Other brand and product names are registered trademarks or trademarks of their respective holders. Statement of Conditions In the interest of improving internal design, operational function, and/or reliability, Bay Networks, Inc.
Introduction This document outlines the procedure for upgrading the boot firmware for the Bay Networks™ BayStack™ 100-series network management module (NMM). If you are using the version 1.5 agent for the BayStack 100-series NMM, revision D boot firmware is necessary to enable the following feature upgrades: • Configuration menu passwords This feature allows you to designate read-only and read-write passwords for access to the NMM configuration menus through the communications port.
Upgrade Instructions for the BayStack 100-series Version D Boot Firmware Package Contents The BayStack 100-series NMM Version D Boot Firmware upgrade kit contains the following components: • • A boot PROM for the type of NMM you have: – Bay Networks part number CG1011003 for Basic NMMs – Bay Networks part number CG1011005 for Advanced and SA NMMs One copy of this guide, Upgrade Instructions for the BayStack 100-series Version D Boot Firmware (Bay Networks part number 893-00978-A) Required Tools To p
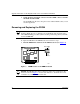
. Using a #1 Phillips screwdriver, remove the screws from the NMM faceplate in the hub expansion slot. 6. Rotate the extractor lever to its unlocked position (see Figure 1). Ether net S A NM M 5982.1 Figure 1. 7. Disengaging the NMM from the hub Slide the NMM out of the expansion slot. Accessing the NMM Baseboard If you have an SA or upgraded Advanced NMM, you must remove the data collection module (DCM) before you can replace the boot PROM. To remove the DCM, follow these steps: 1.
Upgrade Instructions for the BayStack 100-series Version D Boot Firmware 2. Gently disengage the DCM connector from the NMM connector and lift the DCM off of the NMM. Set the DCM aside. Be sure to keep the screws with the DCM so that you can use them again later. Removing and Replacing the PROM Caution: The NMM baseboard contains devices that are sensitive to electrostatic discharge (ESD).
2. Remove the PROM. a. Use an industry-standard IC extraction tool to firmly clamp the sides of the PROM. Caution: Be careful that the extraction tool you use does not bend or put pressure on the chips adjacent to the PROM socket. b. With the extraction tool in place, pull straight up on the PROM until it disengages from its socket. Note: Do not force the PROM out of its socket.
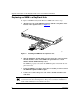
Upgrade Instructions for the BayStack 100-series Version D Boot Firmware Replacing an NMM in a BayStack Hub To replace an NMM in a BayStack 100-series NMM, follow these steps: 1. Align the left edge of the NMM metal frame with the card guides on the left side of the expansion slot (see Figure 4). 5982 Figure 4. 2. Installing the NMM into the expansion slot Slide the NMM into the hub until you feel it engage the connector inside the hub.