
User's Manual


Transferring calls 59
P0911621 Issue 02 Enterprise Edge 2.0 Voice Messaging Reference Guide
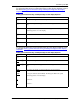
Setting up Outbound Transfer to a phone number
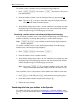
To set up Outbound Transfer to a phone number for the first time:
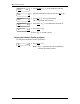
Setting up Outbound Transfer to an extension
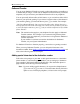
To set up Outbound Transfer to an extension for the first time:
1. Press ƒ
·°⁄
to open your mailbox.
2. Enter your mailbox password and press
OK
or
£
.
3. Press
ADMIN
or
°
.
4. Press
°
to open the Outbound Transfer (
xfr
) menu.
5. Press
ADMIN
or
⁄
to set up Outbound Transfer.
6. Enter the destination phone number and press
OK
or
£
.
7. Press
OK
or
£
to accept the destination number
(represented by the
<x>
). Press
ADD
or
¤
to add
special characters. For information, refer to Adding
special characters to the destination number on page
56. After you add special characters, press
OK
or
£
to
accept the destination number.
8. Press
CHNG
or
⁄
to turn Outbound Transfer on.
9. Press
QUIT
or
•
.
10. Press
®
to end this session.
1. Press ƒ
·°⁄
to open your mailbox.
2. Enter your mailbox password and press
OK
or
£
.
3. Press
ADMIN
or
°
.
4. Press
°
to open the Outbound Transfer (
xfr
) menu.
Pswd:
OTHR RETRY OK
0 new 0 saved
PLAY REC ADMIN
Mailbox admin
GREET PSWD QUIT
Outbound xfr
ADMIN SELECT
Ph:
RETRY OK
<x>
ADD OK
Transfer: off
CHNG QUIT
Transfer: on
CHNG QUIT
Pswd:
OTHR RETRY OK
0 new 0 saved
PLAY REC ADMIN
Mailbox admin
GREET PSWD QUIT