
User's Manual
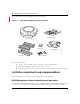


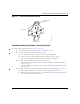
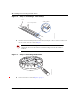
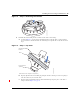
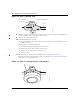
Table Of Contents
- Nortel WLAN Access Point 2332 Series Installation Guide
- Contents
- How to get help
- Introducing the Nortel WLAN 2332 Series System
- AP overview
- Installing and connecting an 2332 Series
- External Antennas

Installing and connecting an 2332 Series 37
Nortel WLAN Access Point 2332 Series Installation Guide
Figure 5. Universal Mounting Bracket
Suspended ceiling installation—flush ceiling tiles
(For required mounting hardware and tools, see Table 3 on page 36.)
1 Select an installation location that is centered over a T-bar in the ceiling.
2 Cut a hole as follows in the ceiling tile for the Cat-5 cable:
a Place the mounting template over the area where you plan to install the AP.
b Use the box cutter to cut along the line marking the opening for the port connector.
c Remove the mounting template and the material you cut from the ceiling panel.
3 Determine whether to install a T-bar clamp onto the ceiling T-bar:
• If the T-bar width is 14.2 mm (9/16 inches), you need to install the 14.2-mm (9/16-inch) T-bar
clamp. Go to step 4.
• If the T-bar width is 23.9 mm (15/16 inches), the universal mounting bracket fits directly onto the
T-bar. Go to step 5.
4 Install the 14.2-mm (9/16-inch) T-bar clamp onto the ceiling T-bar as shown in Figure 6 on page 38.
a Slide each half of the clamp onto the T-bar so that the clamp lip is fully on the T-bar.
b Slide the two halves of the clamp toward each other until the tabs are inserted completely into the
holes and the clamp fits snugly on the T-bar.
840-9502-0018
Port connector
opening
T-bar flanges
Screw holes