
User Manual
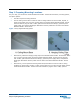

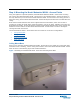
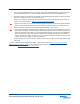
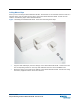
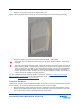
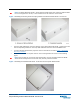
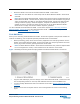
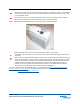
Table Of Contents
- Internal-Antenna Nortel Networks WLAN - Access Point Quick Installation Guide
- ATTENTION!
- Overview
- Step 1: Collecting Required Tools and Supplies
- Step 2: Configuring the Nortel Networks WLAN - Access Point Before Installation
- Step 3: Preparing Mounting Locations
- Step 4: Mounting the Nortel Networks WLAN - Access Points
- Step 5: Returning MAC Information
- Planning Notes
- Safety Considerations

March 16, 2004 18
Step 4: Mounting the Nortel Networks WLAN - Access Points
• Attach the cables to the sides of the Nortel Networks WLAN - Access Point.
Note: Make sure the cables are routed away from the Nortel Networks WLAN - Access Point
antennas.
Note: When the Nortel Networks WLAN - Access Point is powered up and is associated with an
Nortel Networks WLAN - Wireless Security Switch (Green/Power and Yellow/802.11b/g and/or
Yellow or Amber/802.11a LEDs lit), the Nortel Networks WLAN - Access Point begins broad-
casting its beacon signal(s). When this happens, complete the installation as quickly as
possible to remove yourself from within 8 inches (20 cm) of the Nortel Networks WLAN -
Access Point to comply with FCC RF radiation exposure guidelines.
You have installed the Nortel Networks WLAN - Access Point. Repeat Step 4: Mounting the Nortel
Networks WLAN - Access Points for each Nortel Networks WLAN - Access Point location, and then
continue with Step 5: Returning MAC Information
.
Flush Wall MountFlush Wall Mount
When you are mounting the Nortel Networks WLAN - Access Point against a wall (flat side toward the
inside of the building), use an optional separately-orderable flush-mount bracket.
• Before proceeding, gently screw the two factory-supplied screws and spring washers into the
bottom of the Nortel Networks WLAN - Access Point. Make sure the spring washers have their
convex (high center sections) pointing toward the screw heads.
Note: The Nortel Networks WLAN - Access Point threaded holes have precision-depth threads.
Do not overtighten the screws, or the bracket will not fit under the screw heads.
Figure - Assembling the Mounting Screws and Spring Washers to the Nortel Networks WLAN - Access Point
• Copy the MAC address(es) from the label(s) on the Nortel Networks WLAN - Access Point onto
the corresponding location on the map. MAC addresses have the format 000B85xxxxxx.
• You have already attached the flush-mount bracket to the wall in Step 3: Preparing Mounting
Locations.
• Slide the screws into the keyhole slots on the mounting bracket as shown in the following
figure.