
Manual


Chapter 2 Hardware Installation and Initial Configuration
Connecting and Powering up the Application Gateway
14
Application Gateway Hardware Installation Guide
f. Enter the Subnet Mask 255.255.0.0.
g. Enter the Default Gateway and click OK twice.
6 Change the Application Gateway network settings:
a. From a web browser on the connected PC, enter
https://10.20.30.40:9001 to access the Application Gateway
Administration Tool.
b. If a Security Alert dialog box appears, click Yes.
c. Click the Network tab, log in as root, and enter the root password
(defaults to rootadmin).
d. On the Network > Interfaces page, enter the IP address and netmask
for Interface 0 and the IP address of the gateway device.
e. Click Submit to save your changes. Close the Administration Tool.
7 Disconnect the Ethernet crossover cable from the Application Gateway.
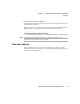
8 Connect the 10/100 RJ45 NIC connectors located on the Application
Gateway back panel as follows.
• If the Application Gateway can access the connected device (router,
application server, etc.) from the same subnet as it receives client
requests, use one network cable. Connect Application Gateway
interface port 0 (ethernet 2) to your network. This is the typical
configuration.
• If the Application Gateway will straddle two networks, use two
network cables:
–
Connect Application Gateway Interface 0 (Ethernet 2) to the
client-side network.
–
Connect Application Gateway Interface 1 (Ethernet 1) to the
server-side network, directly or indirectly.
The two network interfaces are shown in Figure 4.