
User's Manual


2
✓ NOTE: If you have trouble adding the GoControl Dimmer to a group it may be that the
Home ID and Node ID were not cleared from it after testing. You must fi rst “RESET
UNIT” to remove it from the network. Although adding it to a group includes it in the
network, removing it from a group does not remove it from the network. If removed
from a group, it functions as a repeater (only). “RESET UNIT” removes it completely
from the network.
To Reset Unit (If Required):
In the event that your primary Controller is lost or otherwise inoperable, to reset the
GoControl Dimmer and clear all network information, follow these steps:
1. Tap the top of the switch fi ve (5) times.
2. Press and hold the bottom of the switch for 15 seconds. The LED will increasingly
blink faster to indicate that a Reset is taking place.
Removing from a Network:
The GoControl Dimmer can be removed from the network by the Controller/Gateway.
Refer to the Controller operating instructions for details.
1. Set the Controller into Removal Mode and follow its instruction to delete the
GoControl Dimmer from the Controller.
2. Remove the switch by tapping the paddle 2 times. The LED will begin blinking slowly
for 10 seconds indicating that it has been removed.
3. You should see an indication on your Controller that the “device was removed” from
the network.
BASIC OPERATION
Local Control
Pushing the top or bottom of the switch, the WD500Z-1 allows the user to do the following:
• Turn ON, OFF, DIM or BRIGHTEN the load attached.
• Configure to Control Shades or Window Coverings via Z-Wave network.
• Control other Z-Wave enabled devices. Also, when a controller prompts you
to “Send Node ID” or to “Press Button on Unit”, quickly tap the top or bottom
of the switch once to satisfy those instructions.
• Tapping top of the switch turns the load attached to the previous ON level.
• Tapping bottom of the switch turns the load attached OFF.
• Pressing and holding the top of the switch will brighten the load attached,
and pressing and holding the bottom of the switch will dim the load. When
OFF, pressing and holding the bottom of the switch will cause the load to go
to the minimum dim level.
✓ NOTE: Upon restoration of power after a power loss, the WD500Z-1 returns to
previous known state.
LED Indication
To act as a night light, the LED on the GoControl Dimmer will turn ON when the load
attached is OFF. However, the LED can be user confi gured to turn ON, when the load
attached is ON, if so desired. See “CONFIGURATION” section.
Remote Control
The GoControl Dimmer will respond to BASIC and BINARY commands that are part of
the Z-Wave system. Refer to your Controller’s instructions as to whether your Controller
can transmit those commands.
ADVANCED OPERATION
All On/All Off
The GoControl Dimmer supports the ALL ON / ALL OFF commands. The GoControl
Dimmer can be set to respond to ALL ON and ALL OFF commands four different ways.
Refer to your Controller for information on how to set the GoControl Dimmer to operate
in the manner you desire. Some Controllers may be only able to set certain settings of
ALL ON/ALL OFF response.
The four different ways the GoControl Dimmer can be setup to respond to ALL ON and
ALL OFF commands are:
1. Responds to ALL ON or the ALL OFF command.
2. Responds to ALL OFF command but will not respond to ALL ON command.
3. Responds to ALL ON command but will not respond to ALL OFF command.
4. Responds to ALL ON and the ALL OFF command.
Associations
The GoControl Dimmer supports one Group with fi ve Nodes for lifeline communication.
Group 1 must be assigned the Node ID of the Controller to which unsolicited notifi cations
from the GoControl Dimmer will be sent. The Z-Wave Controller should set this
Association automatically after inclusion. You can associate up to fi ve Z-Wave devices to
Group 1. Lifeline Association only supports the “manual reset” event.
For instructions on how to “set Lifeline Association” please refer to your wireless
Controller instructions.
Creating Associations
1. Learn all devices into the Z-Wave Hub.
2. Tap the paddle of the GoControl Dimmer four times quickly to enter Association
mode. The LED will begin to blink quickly (twice per second).
3. Follow the instructions for inclusion or exclusion of the device to be associated. For
GoControl devices, tap the button one or two times.
4. Repeat Step #2 and #3 for up to 5 total dimmers and / or switches within 60 seconds
of entering Association mode.
5. Association mode will turn off after 60 seconds or when a node has been associated.
Although the Associations are now functional, it is recommended that you refer to
your Hubs instructions to “Poll” or “Heal” the Z-Wave network to recognize the new
Associations.
Removing Associations
To remove the Associations, if the Hub has recognized the Associations, refer to the
Z-Wave Hub’s instructions on how to remove Associations. If the Hub has not recognized
the Associations, removing the GoControl Dimmer from the Z-Wave network will
eliminate the Associations
New Central Scene Command Class Support
The GoControl Dimmer Switch supports the new Central Scene Command Class. This
allows the Switch to execute up to 10 independent events that are triggered by Key
Attributes related to (2) two Scene Numbers.
By tapping or holding down the top or bottom of the Switch paddle a specifi c Scene
Number Key Attribute is transmitted as shown below in addition to the standard operation
of the switch as described above in Basic Operations Load Control section.
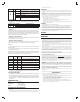
Paddle Presses
Scene
Number
Key Attribute
Press & Hold Top 1 2
Release Top 1 1
Single Tap Top 1 0
Double Tap Top 1 3
Triple Tap Top 1 4
Press & Hold Bottom 2 2
Release Bottom 2 1
Single Tap Bottom 2 0
Double Tap Bottom 2 3
Triple Tap Bottom 2 4
When the paddle is tapped or pressed, the dimmer sends the Scene Number and Key
Attribute to the Z-Wave Hub via Association Group 1. The hub can then control any
Z-Wave devices supported by the Hub. Refer to your Z-Wave Hub instructions for details
on how to control other devices using the Central Scene feature.
✓ NOTE: The Z-Wave Hub has to support the Central Scene Command Class in order
to take advantage of this feature.
✓ NOTE: The Scene Number is not the same as standard Z-Wave Scenes IDs. The
Scene Number is simply the top (1) or bottom (2) of the paddle and is not a “Scene”
in the classic Z-Wave sense. The Key Attribute tells the Hub how the paddle was
pressed as described in the table above.
CONFIGURATION
The Start Level sent in a Dim command can be ignored or not. Typically the dim
level should start from the current level and dim from there instead of suddenly
changing to the Start Level and then dimming.
Set Ignore Start Level Bit When Transmitting Dim
Commands
The Start Level sent in a Dim command can be ignored or not. Typically the dim level
should start from the current level and dim from there instad of suddenly changing to the
Start Level and then dimming.
Parameter Length Valid Values Confi guration Option
5
1 Byte
0
Use the Start Level in the Dim Command
1 Ignore the Start Level in the Dim Command(default)
Night Light
By default, the LED on the GoControl Dimmer will turn OFF when the load attached
is turned ON. To make the LED turn ON when the load attached is turned ON, set
Parameter 3 to a value of 1.