
Installation Guide


18
• Use only solid PVC / CPVC (schedule 40) or PP
pipe.
• 2 in. or 3 in. schedule 80 pipe may also be used
on this Water Heater, however the Btu/h input of
the Water Heater will be reduced by up to 9%.
• Maintain the same vent pipe diameter from the
Water Heater flue to the termination.
• In Canada, plastic vent systems must be certified
to ULC S636. The components of the certified
vent system must not be interchanged with other
vent systems or unlisted pipe/fittings.
• In Canada, specified primers and glues of the ULC
S636 certified vent system must be from a single
system manufacturer and not intermixed with
other system manufacturer’s vent system parts.
6.2.2 Installation Instructions
NOTE
Covering non-metallic vent pipe and
fittings with thermal insulation is
prohibited.
• When preparing and assembling the pipe,
follow instructions as provided by the pipe
manufacturer. In general, the following practices
must be observed:
- Squarely cut all pieces of pipe.
- Remove all burrs and debris from joints and
fittings.
- All joints must be properly cleaned, primed,
and cemented. Use only cement and primer
approved for use with the pipe material as
outlined on page 17.
• PVC, CPVC or PP pipe has been approved for
use on this Water Heater with zero clearance to
combustibles.
• The pipe shall be installed so that the first 3 ft
(0.9 m) of pipe from the Water Heater flue outlet
is readily accessible for visual inspection.
• When attaching the piping to the Water Heater,
use the appropriate primer and cement to ensure
a proper seal.
CARBON MONOXIDE POISONING
Failure to properly seal the vent system could
cause flue products to enter the living space.
WARNING
• Follow all general venting guidelines as outlined in
this manual.
• Clearance described in this document is the
minimum recommendation/required distance.
Take appropriate clearance according to the
situations of the site.
• Make sure the vent system is gas tight and will
not leak.
• Support the vent pipe with hangers at regular
intervals as specified by these instructions or the
instructions of the vent manufacturer.
• All piping must be fully supported. Use pipe
hangers at a minimum of 3 ft (0.9 m) intervals.
NOTE
Do not use the Water Heater to
support the vent piping.
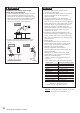
• Ensure at least 3 ft (0.9 m) or more distance
between the near edge of the air intake pipe or
exhaust pipe to the inside corner of a wall.
Inside corner
3 ft (0.9 m)
or more
[How to tighten the Vent Pipe]
1. Continue to insert the Vent Pipe until it reaches
to the base of the Water Heater Exhaust and
Intake Flue.
• The Vent Pipe will be inserted approximately
2.3 in. (60 mm).
2. Secure the Vent Pipe by tightening the band
using a screwdriver.
• The tightening torque shall be the following:
- For PVC/CPVC pipe: between 16 and 20 in lb
- For PP pipe: between 12 and 15 in lb
Exhaust and
Intake Flue
Screwdriver
- Flat head
- Box wrench (5/16 in.)
Vent Pipe
6.2.3 Termination Considerations
• Steam or condensed water may come out from
the vent termination. Select the location for
the termination as to prevent injury or property
damage.
• If snow is expected to accumulate, make sure the
termination will not be covered with snow or hit
by falling lumps of snow.
Venting the Water Heater