XA525 Rechargeable Cordless Shave Toolkit Always here to help you Register your product and get support at www.norelco.com/register 12_XA525.
12_XA525.
12_XA525.indd 3 ENGLISH 4 ESPAÑOL 24 Congratulations on your purchase and welcome to Philips Norelco! To fully benefit from the support that Philips Norelco offers, register your product at www.norelco.com/register XA525 ¡Bienvenido a Philips Norelco y felicitaciones por su compra! Para utilizar los servicios de asistencia técnica de Philips Norelco, registre su producto en www.norelco.
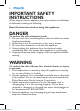
English IMPORTANT SAFETY INSTRUCTIONS When using an electric appliance, basic precautions should always be followed, including the following: Read all instructions before using this appliance. DANGER To reduce the risk of electric shock: 1. Do not reach for a corded appliance that has fallen into water. Unplug immediately. 2. Power plug is not for immersion or for use in shower. 3. Do not use an extension cord with this appliance. 4.
English 5 5. Never drop or insert any object into any opening. 6. Do not charge or plug in appliance outdoors or operate where aerosol (spray) products are being used or where oxygen is being administered. 7. Do not use this appliance with a damaged or broken comb, as facial injury may occur. Always check foil, cutters and trimmer before using. Do not use appliance if foil, cutters or trimmers are damaged as injury may occur. 8. Always attach plug to appliance first, then plug into outlet.
12_XA525.indd 6 English 45 - DAY MONEY-BACK GUARANTEE To enjoy the closest and most comfortable shave from your new Philips Norelco appliance, the appliance should be used exclusively for 3 weeks. This allows your hair and skin enough time to adapt to the Philips Norelco Shaving System. If, after that period of time, you are not fully satisfied with your Philips Norelco appliance, send the product back along with dated sales receipt and we’ll refund you the full purchase price.
12_XA525.indd 7 English 7 Table of Contents Features......................................................... 8-9 Our Story.......................................................10 Before First Use............................................10 Charging/(Re)Charging..........................10-11 Quick Charge................................................11 Skin Adaptation Period................................11 Shaving.......................................................12-14 Body Grooming...........
12_XA525.
12_XA525.
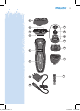
12_XA525.indd 10 English our story This tool does it all, now so can you. The heads click on and off, so you can switch from facial to body grooming without breaking your shaving stride. Once you’re done, go share your all-over smoothness with someone. Extend your style by adding additional accessories.
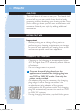
12_XA525.indd 11 English 11 2 Charging and (re)charging requires 1 full hour for a cordless shaving time of up to 40 minutes. Note: First time charging or charging after a long period of non-use requires 90 minutes of charge time. - When the battery is fully charged, the battery symbol lights up green continuously. After approximately 30 minutes, the light goes out. - When the battery is almost empty, the plug symbol blinks orange.
12_XA525.indd 12 English Shaving -- This symbol on the appliance indicates that the appliance can be used in both the bath and shower. -- Use this appliance for its intended household use as described in this manual. -- Only use the shaving attachment to shave facial hair. Tip: You can shave wet with shaving cream or gel or dry for convenience and quick touch-ups between shaves. Shaving with a clean face gives best results. 1 Attach shaving unit to appliance. Do not twist.
12_XA525.indd 13 English 13 5 Put Protective cap on appliance. Wet Shaving 1 Splash warm water on your face. 2 Apply shaving cream or gel to your skin. 3 Rinse shaving unit under water. 4 Turn appliance ON. 5 Gently press razor to skin. Move the razor in both straight and circular movements. Tip: Rinsing the shaving unit with water before and during shaving ensures the razor heads glide smoothly over your skin, while removing residual shaving foam/gel. Gently press razor to skin for optimal results.
English 7 Dry your face with a soft cloth. 8 Clean heads after each shave (see’Cleaning’) . 9 Put Protective cap on appliance. Body Grooming -- Only use the Bodygroom attachment to groom or trim body hair below the neckline. Do not use it to shave or trim facial or scalp hair. Note: Before using, check foil, cutters, trimmers and combs for wear or damage. If they show signs of wear or damage, do not use.
12_XA525.indd 15 English 15 1 Snap the comb onto the appliance making sure the teeth of the comb point in the direction you will move the appliance. -- When you move the appliance towards you, the teeth must point towards you. -- When you move the appliance away from you, the teeth must point away from you. 2 Turn the appliance ON. 3 Move the appliance against the direction of hair growth. 4 Make sure the flat part of the trimming comb is always in full contact with the skin.
12_XA525.indd 16 English 5 Groom desired body parts below the neckline. 6 Turn appliance OFF. 7 Clean the bodygroom attachment after each use (see ‘Cleaning’). Trimming and Grooming Tips -- For best trimming results, skin and hair should be clean and dry. -- For best body grooming results, use in the shower or bath. Apply shaving cream or gel to skin for easy gliding. -- Do not move the appliance too fast. Make smooth and gentle movements. -- Do not press too hard.
English 17 2 Press the shaving unit release buttons (1) and pull shaving unit off the shaving attachment (2). 3 Rinse the shaving unit for 30 seconds under hot water. 4 Carefully shake off excess water and let the shaving unit air dry thoroughly. Never dry the shaving unit with a towel or tissue as damage may occur to the shaving heads. 5 Reattach the shaving unit to the shaving attachment. 12_XA525.
English 3 Lift the retaining ring out of the shaving head holder. 4 Remove the cutter and comb and separate the cutter from the comb. Tip: Do not clean more than one cutter and comb at a time as they are matching sets. If you accidentally put a cutter in the wrong comb, it may take several weeks before optimal shaving performance is restored. 5 Clean the inside and outside of both the cutter and comb with the supplied brush.
12_XA525.indd 19 English 19 that the shaving heads and retaining rings are positioned properly. Cleaning the Bodygroom Attachment 1 If a trimming comb is attached to the appliance, remove it. 2 Pull the bodygroom foil off the attachment. Do not apply pressure to foil. Do not touch foil with hard objects as this may dent or damage foil or cutters. If damage occurs, replace damaged parts. 3 Rinse the bodygroom attachment, foil and comb under hot water.
English 2 Remove the shaving heads and place new ones in the shaving head holder making sure the two wings of the shaving heads fit exactly into the recesses. 3 Reattach the retaining ring (1) by turning it the opposite direction of the arrows on the retaining ring (2). Make sure the four wings of the retaining ring are located exactly under the recesses of the shaving head holder. 4 Reattach the shaving unit to the shaving attachment.
12_XA525.indd 21 English 21 -- Do not wrap the power cord around the appliance. -- Put the protective cap on the shaving attachment. Assistance -- For assistance, visit our website: www.philips.com/support or call toll free 1-800-243-3050 -- Online information is available 24 hours a day, 7 days a week. Battery Removal -- This Philips Norelco appliance contains a rechargeable Nickel Metal Hydride Battery. -- Battery should only be removed when appliance is to be discarded.
English 6 Break the snap hooks (1) and remove front panel of the power unit (2). 7 Take out battery holder (1) and cut battery tags with pliers (2). 8 Remove rechargeable battery. Be careful, the battery strips are sharp. 12_XA525.indd 22 9 Do not attempt to replace battery. Insulate battery ends by covering with tape and/or in a small plastic bag. 10 Discard appliance. Do not attempt to plug power cord into outlet or recharge appliance after the battery has been removed.
English 23 FULL TWO YEAR WARRANTY Philips Electronics North America Corporation warrants each new Philips Norelco Product, Model XA525 (except cutters, combs and foil) against defects in materials or workmanship for a period of two years from the date of purchase, and agrees to repair or replace any defective product without charge.
ESPAÑOL INSTRUCCIONES IMPORTANTES DE SEGURIDAD Cuando utilice un artefacto eléctrico, tome las precauciones básicas. Lea las instrucciones antes de utilizar este producto. PELIGRO Para reducir el riesgo de descarga eléctrica: 1. No intente sujetar un aparato enchufada que se haya caído al agua. Desenchúfela inmediatamente. 2. El conector no deben sumergirse ni usarse en la ducha. 3. No utilice el artefacto con un cable de extensión. 4.
ESPAÑOL 25 dañada o si se sumergió en agua mientras estaba conectada. Para solicitar asistencia, comuníquese al 1-800-243-3050. 4. Mantenga el aparato, el cable y el enchufe de carga lejos de superficies calientes. 5. No deje caer ni introduzca ningún objeto en las aberturas. 6. No cargue ni enchufe el aparato al aire libre ni la utilice en lugares donde se usen aerosoles (sprays) o se administre oxígeno. 7.
12_XA525.indd 26 ESPAÑOL GARANTÍA DE DEVOLUCIÓN DEL IMPORTE DE 45 DÍAS Use su nuevo aparato Philips Norelco para hombres como método exclusivo de afeitado durante tres semanas para disfrutar de un afeitado cómodo y al ras. Esto permite que su pelo y su piel se acostumbren al sistema de afeitado Philips Norelco.
12_XA525.indd 27 ESPAÑOL 27 Tabla de contenido Características.........................................28-29 Nuestra Historia...........................................30 Antes del primer uso...................................30 Carga/(Re)carga.......................................30-31 Carga rápida...................................................31 Periodo de adaptación de la piel...............32 Afeitado.....................................................32-34 Cuidados del cuerpo..................
12_XA525.
12_XA525.
12_XA525.indd 30 ESPAÑOL NUESTRA HISTORIA Esta herramienta lo hace todo y, ahora, usted también puede. Los cabezales se colocan y se sacan a presión, por lo que puede cambiar del afeitado de la cara al afeitado del cuerpo sin interrupción. Una vez que termine, comparta su suavidad con quien quiera. Extiende tu estilo agregando accesorios adicionales.
12_XA525.indd 31 ESPAÑOL 31 -- En algunos países puede ser necesario el uso de un adaptador para el conector de carga. Utilice un adaptador apropiado para el tipo de tomacorriente. El conector de carga realizará un proceso automático de conversión de sistemas de 100 V a 240 V de CA. -- Durante la carga, el símbolo de batería parpadea en verde. 2 La carga y recarga demoran una hora completa y proporcionan un tiempo de afeitado inalámbrico de 40 minutos.
12_XA525.indd 32 ESPAÑOL Periodo de adaptación de la piel -- Es posible que al principio no obtenga el afeitado al ras que desea e incluso su piel puede irritarse levemente. Esto es normal, ya que la barba y la piel necesitan tiempo para acostumbrarse. Pruebe este producto durante 3 semanas y pronto disfrutará al máximo de su nueva afeitadora. -- ¡Sea perseverante! Si alterna métodos de afeitado durante el período de adaptación, será más difícil acostumbrarse.
12_XA525.indd 33 ESPAÑOL 33 Afeitadoras en seco 1 Encienda la afeitadora (ON). 2 Presione gentilmente la unidad de afeitado sobre la piel. Mueva la unidad de afeitado con movimientos rectos y circulares. 3 Apague la afeitadora (OFF). 4 Limpie la unidad de afeitado siempre después de afeitarse (consulte ‘Limpieza’). 5 Coloque la tapa protectora en el aparato. Afeitado húmedo 1 Humedezca su rostro con agua tibia. 2 Aplique crema o gel de afeitar sobre la piel.
12_XA525.indd 34 ESPAÑOL 3 Enjuague la unidad de afeitado bajo el agua. 4 Encienda la afeitadora (ON). 5 Presione suavemente la afeitadora sobre la piel. Mueva la afeitadora en forma recta y circular Consejo: Enjuagar con agua la unidad de afeitado antes y durante el afeitado asegura que los cabezales de la afeitadora se muevan suavemente sobre su piel al tiempo que remueven residuos de espuma o gel de afeitar. Para obtener resultados óptimos, presione suavemente la afeitadora sobre la piel.
ESPAÑOL 35 Reemplace de inmediato (consulte la sección ‘Reemplazo de la hoja de cuidados del cuerpo’).. 1 Tire del accesorio de afeitado para retirarlo de la unidad. No lo gire. 2 Coloque el accesorio de cuidado del cuerpo. Presione con fuerza. Uso del peine recortador 12_XA525.indd 35 Nota: Si el vello mide más de 10 mm, primero, recórtelo con el peine hasta alcanzar los 3 mm, para facilitar el afeitado.
12_XA525.indd 36 ESPAÑOL 4 Asegúrese de que la parte plana del peine recortador esté siempre en contacto con la piel. 5 Corte el vello debajo de la línea del cuello. 6 Apague la afeitadora (OFF). 7 Limpie el accesorio de afeitado corporal después de cada uso (consulte ‘Limpieza’). Afeitado corporal 1 Coloque el accesorio de afeitado corporal en la afeitadora. 2 Encienda la afeitadora (ON). 3 Mueva la afeitadora en dirección contraria al crecimiento del vello.
ESPAÑOL 37 -- No mueva la afeitadora demasiado rápido. Los movimientos deben ser lentos y suaves. -- No presione con mucha fuerza, ya que puede causar irritación en la piel. -- Al estirar la piel con la mano libre, el vello se endurece y se evita la irritación en la piel. Limpieza -- No use agentes de limpieza abrasivos ni líquidos agresivos como gasolina para limpiar la cortadora y sus accesorios. -- Tenga precaución con el agua caliente. Siempre pruebe primero el agua para no quemarse las manos.
ESPAÑOL 5 Vuelva a colocar la unidad de afeitado en el accesorio de afeitado. Nota: También puede limpiar el accesorio de afeitado y la unidad de afeitado con el cepillo suministrado. Método de limpieza a fondo 1 Presione los botones de liberación de la unidad de afeitado (1) y jale la unidad de afeitado para separarla del accesorio de afeitado (2) . 2 Desbloquee el anillo naranjo de retención. Para esto, gírelo en la dirección de las flechas que aparece en el anillo de retención.
ESPAÑOL 39 5 Limpie el interior y el exterior de la cortadora y peine con el cepillo suministrado. 6 Coloque el peine en el soporte del cabezal de la afeitadora, asegurándose de que las dos aletas encajen perfectamente en los orificios del soporte del cabezal de la afeitadora. 7 Coloque la cortadora en el soporte del cabezal de afeitado con las puntas apuntando hacia abajo. 8 Para volver a colocar el anillo de retención (1) gírelo en dirección opuesta a las flechas del anillo de retención (2).
ESPAÑOL 2 Quite la hoja del accesorio de afeitado corporal. No presione la hoja. No toque la hoja con objetos duros, para no deformar o dañar la hoja ni las cortadoras. Si se daña alguna pieza, reemplácela. 3 Enjuague el accesorio, la hoja y el peine de modelado de barba con agua caliente. También puede limpiar el accesorio, la hoja y el peine con el cepillo suministrado. 4 Extraiga el exceso de agua y deje que se seque bien. 5 Vuelva a colocar la hoja de afeitado corporal en el accesorio. . 12_XA525.
ESPAÑOL 41 3 Para volver a colocar el anillo de retención (1) gírelo en dirección opuesta a las flechas en el anillo de retención (2). Asegúrese de que las cuatro aletas del anillo de retención estén ubicadas exactamente debajo de los orificios del soporte del cabezal de la afeitadora. 4 Vuelva a colocar la unidad de afeitado en el accesorio de afeitado. Si no cierra fácilmente, verifique que los cabezales de afeitado y los anillos de retención estén en la posición correcta.
12_XA525.indd 42 ESPAÑOL -- No enrolle el cable de alimentación alrededor de la afeitadora. -- Coloque la tapa de protección en el accesorio de afeitado. Ayuda -- Para obtener asistencia, ingrese en nuestro sitio web: www.philips.com/support o llame al número gratuito 1-800-243-3050 -- La información en línea está disponible las 24 horas, los 7 días de la semana. Extracción de las baterías -- Este aparato Philips contiene una batería recargable de níquel metal hidruro.
ESPAÑOL 43 5 Doble los ganchos hacia un lado y saque la unidad motora. 6 Rompa los ganchos (1) y quite el panel delantero de la unidad motora (2). 7 Quite el soporte de la batería (1) y corte las etiquetas de la batería con un alicate (2). 12_XA525.indd 43 8 Extraiga la batería recargable. Tenga cuidado con las tiras de la batería, ya que son afiladas. 9 No intente reemplazar la batería.
12_XA525.indd 44 ESPAÑOL Accesorios -- Cabezales de afeitado de repuesto Modelo RQ32: para el máximo rendimiento de la afeitadora, sustituya los cabezales de afeitado Philips Norelco cada 12 meses.
12_XA525.
12_XA525.
12_XA525.
GARANTÍA TOTAL POR DOS AÑOS Philips Electronics North America Corporation garantiza cada nuevo producto Philips Norelco, modelo XA525 (excepto cuchillas, peines y láminas) contra defectos de materiales o de fabricación durante un período de dos años desde la fecha de compra, y se compromete a reparar o sustituir sin cargo cualquier producto defectuoso.