
Manual

3-18 Tour of Fluidmove
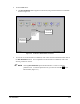
Teach Window
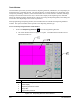
Teach Windows open when you teach locations, dispensing elements, and fiducials, etc. and prompt you
through the steps to complete the task. The specific features of a Teach Window vary depending on the
task you are performing. However, most Teach Windows have several features in common, including a
message area with instructions for the user, a camera video display of the dispensing area, command
buttons for teaching locations, XYZ Position Controls for moving the Dispensing Head, and a dialog box
section that varies depending on the task to be performed.
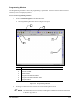
When programming a dispensing element, the Teach Window also includes the Dispensing Elements
Toolbar. The options available will be specific to the dispensing element type.
To access the Dispensing Elements Teach Window:
1. Click on the
Dispensing Elements icon in the Programming Window.
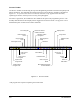
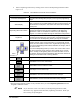
!The Teach Window shown in Figure 3-13 opens. Teach Window functional areas are
described in Table 3-2.
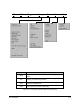
Item Description
1 Instruction Message Box
2 Video Display
3 Dispensing Elements Toolbar
4 Target Box
5 Jog (Position) Controls
Figure 3-13 Dispensing Elements Teach Window
3
1
2
5
4