
Manual
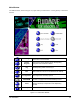

Tour of Fluidmove 3-7
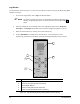
Dispensing Head Position Controls
1. Click the
Dispenser radio button to activate the Dispensing Head.
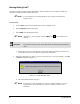
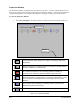
2. Dispensing Head position controls (Figure 3-3) operate as follows:
!On the X-Y control panel, the arrows pointing to the
Left move the Dispensing Head to the
left and the arrows pointing to the
Right move it to the right.
!On the X-Y control panel, the arrows pointing
Up move the Dispensing Head toward the
back of the dispensing area and the arrows pointing
Down move it toward the front of the
dispensing area.
!On the Z control panel, the arrows pointing
Up move the Dispensing Head upward and the
arrows pointing
Down move it downward.
" NOTE The single arrows and double arrows
move the Dispensing Head different
distances per Mouse click and at different velocities. Refer to the manual for
your particular dispensing system for the default values. You can configure this
distance by clicking the
Config button in the Jog Window and specifying a value
in the appropriate text box.
3. Clicking on
Home sends the Dispensing Head to its “Home” position. The home position is
the extreme left front corner of the dispensing area, where the Dispensing Head X, Y, Z-axis
coordinates are set to (0, 0, 0).
4. The Target Box is a model of the entire dispensing area. The crosshair is configured to match
the Camera location. When you use the mouse to move the crosshairs in the Target Box, the
Dispensing Head moves to the corresponding position in the dispensing area.
5. Clicking on
Video opens the Video Display in which you can see a close-up of the
Dispensing Area.
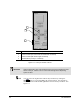
Conveyor Position Controls
1. Click the
Conveyor 1 or Conveyor 2 radio button to activate the Conveyor.
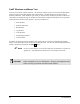
2. Conveyor position controls (Figure 3-4) operate as follows:
!On the X-Y control panel, the arrows pointing to the
Left move the Conveyor belt to the
left and the arrows pointing to the
Right move it to the right.
!On the X-Y control panel, the arrows pointing
Up move the rear rail toward the back of
the dispensing area and the arrows pointing
Down move the rear rail toward the front of
the dispensing area.
" NOTE The single arrows and double arrows
move the Conveyor rail or belt
different distances per Mouse click. Refer to the manual for your particular
dispensing system for the default values. You can configure this distance by
clicking the
Config button in the Jog Window and specifying a value in the
appropriate text box.