
Manual


7-20 Advanced Programming
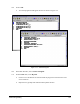
55. Click on Teach.
56. Use the Position Controls to move the Dispensing Head to the LLHC of the same flip chip.
! Use Chip Offset or reticles.
57. Click on
Teach.
58. Use the Position Controls to move the Dispensing Head to the LRHC of the same flip chip.
! Use Chip Offset or reticles.
59. Click on
Teach.
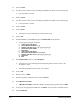
60. Click on
Done.
! A message box opens indicating the calculated line speed.
61. Click on
OK.
62. From the
File menu, select Save and type in Underfill.fmw for the filename.
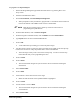
! Your program will appear as follows:
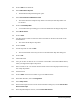
1 START PASS: FOR PASS 1
2 FIND SUBSTRATE HEIGHT: (x, y)
3 WEIGHT CONTROL:50.00, 1, ([x
1
, y
1
],[x
2
, y
2
], [x
3
, y
3
])
4 RESET MULTIPASS TIMER:
5 END PASS:
6 START PASS: FOR PASS 2
7 AWAIT MULTIPASS TIMER: 10 seconds(s)
8 WEIGHT CONTROL:30.000,1, ([x
1
, y
1
],[x
2
, y
2
], [x
3
, y
3
])
9 END PASS:
10 END
63. In the Pattern Name text box, select Workpiece.
! A message box opens indicating that the Dispensing Head is about to move to the
“Workpiece” origin.
! The Dispensing Head will move after your response.
64. Click on
OK.
65. Place the cursor on
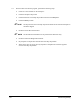
END.
66. From the Program Commands toolbar, click on
Process.
67. Select
Measure Flow Rate.
! A
Measure Flow Rate command is added to the dispensing program just above END.
68. To set up for placing the pattern
Lfill, click on Pattern on the Program Commands toolbar.
69. Select
Loop Block.