
Manual


7-4 Advanced Programming
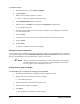
Placing a Pattern
Once the pattern has been created, its location on the workpiece must be defined. Placing a pattern is the
process of defining the pattern locations (placement points) on the workpiece in relation to the workpiece
pattern origin. You can place the same pattern at different locations on a workpiece by teaching two or
more pattern placement points for the pattern.
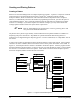
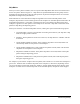
For example in Figure 7-4, the Chip Pattern is placed in three different locations on the workpiece. There
are three pattern placement points.
Figure 7-4 Placing a Pattern at Multiple Locations
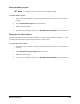
In addition to repeating a pattern at multiple locations on a workpiece, you can also place two or more
different patterns on a workpiece. Select the desired patterns from the list and place them appropriately.
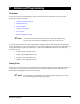
Pattern Rotation
If there is a part on the workpiece that is rotated in relation to the other parts, but is still the same shape
and requires the same dispensing pattern as the other parts, FmNT can rotate the pattern to match the
part’s alignment. The rotation is performed at the pattern’s origin. However, you must know the angle of
rotation for this feature to function properly.
To use the rotation feature:
1. Activate the
Use Rotation feature below the Pattern Name text box. See Figure 7-5.
2. Enter the number of degrees of rotation and the origin location of the pattern to be rotated.
! To find the origin of the pattern to be rotated, move the Dispensing Head to that location
and note the XY coordinates. The same fiducials can be used for the rotated pattern.
! FmNT will rotate the pattern the specified number of degrees at the given location,
dispense the fluid, then return to the original pattern alignment and continue dispensing.
Workpiece
Pattern Origin
Pattern Origin an
d
Placement Poin
t
Pattern Origin and
Placement Point
Pattern Origin and
Placement Point
Chip Pattern
Pattern Origin