
Manual


6-12 Beginning Programming
To program a line:
1. Click on the
Dispensing Elements button on the Program Commands toolbar.
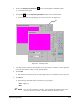
!A Teach Window opens.
2. Choose
Line from the Dispensing Elements toolbar in the Teach Window.
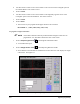
3. Use the Position Controls to move the camera crosshairs to the starting point of the first line in
the upper left-hand corner (ULHC) of the Tutorial Board.
4. Click on
Teach.
5. Use the Position Controls to move the crosshairs to the endpoint of the line.
6. Click on
Teach.
7. Click on
Done.
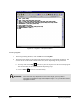
!The following commands will be added to the program.
LINE: 1, Start: (X
1
,Y
1
), End: (X
2
,Y
2
)
END:
" NOTE X
1
,Y
1
are the coordinates for the starting point of the line. X
2
,Y
2
are the
coordinates for the end point of the line. Your program should now look similar
to the one below, however your XY coordinates will differ.
DOT: 1, (0.977, 2.502)
LINE: 1, Start: (0.076, 3.848), End: (1.071, 3.847)
END:
To program an arc:
1. Click on the
Dispensing Elements button on the Program Commands toolbar.
2. Click on
Arc on the Dispensing Elements toolbar.
3. Select the method (SME or Center) for teaching the arc.
4. Use the Position Controls to move the Dispensing Head to the arc start point.
5. Click on
Teach.
6. Do one of the following:
!If using the SME method, use the Position Controls to move the Dispensing Head to the
arc center point.
!If using the Center method, use the Position Controls to move the Dispensing Head to the
center of the arc.
" NOTE If using the Center method, the center of the arc is actually the center of the circle
that the arc is a part of. You need to fill in the Degrees value for the arc. This
value is the number of degrees of a complete circle the arc will complete.