
Manual


Programming Basics and Setup 5-25
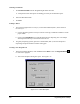
27. Click on the Run Time tab.
!Check for location tolerances means that FmNT will check the found location of the
fiducial and compare it to the location where it expected to find it. If the difference
between the two locations is greater than the Location Tolerance, FmNT will consider the
fiducial to be “Not Found.”
!This ensures that an incorrect fiducial or other feature is not considered to be a
correct fiducial, and prevents dispensing on parts that are too far away from their
expected locations.
28. Click on the
Image tab.
!Gain controls the way digital values are assigned to the analog signal from the camera.
!Lower Gain values will increase the contrast of the image and may help to differentiate the
fiducial from the background. However, a low Gain value may also amplify “noise” in the
image.
!It is recommended that you first adjust the light level, and then adjust the Gain only if
necessary. The default value of the Gain is 255.
29. Click on the
Model Finder tab.
30. When you are satisfied with the fiducial, click on
Teach.
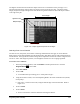
31. Test the fiducial by clicking on
Find Fid.
!The Test Results indicate if the fiducial was found or not, its found XY coordinates, how
sure the system is that it has found the correct fiducial, and how long it took to locate
the fiducial.
32. Click on
Next to accept the results.
33. You are now asked to select the method for Fid 2.
34. Select
Model Finder.
35. Click on
Next.
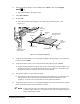
36. Using the Position Controls, move the Dispensing Head to the upper right-hand corner
(URHC) of the tutorial board, center the crosshairs on the dot in the URHC, and repeat the
above steps to teach the second fiducial.
37. Once you have completed teaching the second fiducial, you will have successfully taught the
workpiece fiducials.