
Manual


5-22 Programming Basics and Setup
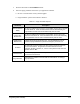
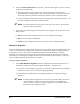
To Teach a Model Fiducial:
1. In the Main Window, click on
Configuration.
2. Select
Setup Workpiece Alignment.
3. In the Workpiece Alignment dialog box, select
Learn Workpiece Angle first and Two
Fiducials
.
4. Click on
OK.
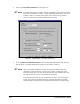
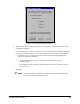
5. Click on
Main in the toolbar to return to the Main Window.
6. In the Main Window, click on
Teach a Program.
!The Programming Window opens.
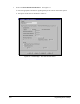
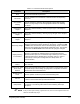
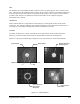
7. Load the Tutorial Board (Side 1) at the mouth of the Conveyor. See Figure 5-12.
Fluidmove for Windows Tutorial Board
Basic Lines POT Spiral Fill EncapsulationRectangle
45° 90° 180° 270°
Weight Control Pattern
Circle
Dots
Flip Chip 1 Flip Chip 2
Flip Chip Underfill
Side 1
P/N 77-RS01-T1, Revision C
Arc
ILLENNIUM
M
SERIES
Y-Axis
X-Axis
(0,0)
(x,y)
Workpiece
Fiducial #2
Workpiece
Fiducial #1
Workpiece
Origin
(x,y)
(0.0)
Fluidmove for Windows Tutorial Board
Basic Lines POT Spiral Fill EncapsulationRectangle
45° 90° 180° 270°
Weight Control Pattern
Circle
Dots
Flip Chip 1 Flip Chip 2
Flip Chip Underfill
Side 1
P/N 77-RS01-T1, Revision C
Arc
ILLENNIUM
M
SERIES
Fluidmove for Windows Tutorial Board
Basic Lines POT Spiral Fill EncapsulationRectangle
45° 90° 180° 270°
Weight Control Pattern
Circle
Dots
Flip Chip 1 Flip Chip 2
Flip Chip Underfill
Side 1
P/N 77-RS01-T1, Revision C
Arc
ILLENNIUM
M
SERIES
ILLENNIUM
M
SERIES
Y-Axis
X-Axis
Y-Axis
X-Axis
(0,0)
(x,y)
Workpiece
Fiducial #2
Workpiece
Fiducial #2
Workpiece
Fiducial #1
Workpiece
Origin
(x,y)
(0.0)
Workpiece
Fiducial #1
Workpiece
Origin
(x,y)
(0.0)
Figure 5-12 Tutorial Board - Side 1
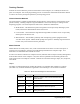
8. Use the dispensing system Conveyor Controls to set the proper width.
9. Choose
Manual Load Board from the Setup menu or click on the Load Board icon.
!The board will be loaded into the dispensing area. The clamps should push the board up
to the rails.