
Manual


System Configuration and Setup 4-47
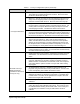
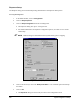
6. The next step is to define a Barcode Filter.
!For example, barcode 1234567890 can be filtered so that 1234789 is associated with one
dispensing program, and 2347890 is associated with a different dispensing program.
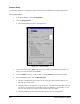
7. Indicate the first starting point for the filter by clicking the up or down arrows next to
Start
At
and selecting a number.
!For example, to obtain the first sample filtered barcode above, 1234789, the filter would
start at 1. Likewise, to obtain the second sample filtered barcode above, 2347890, the
filter would start at 2.
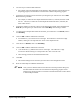
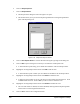
8. Indicate the number of consecutive strings in the filtered barcode that will be included with
Start At by clicking the up or down arrows next to How Many and selecting a number.
9. To obtain the first sample filtered barcode 1234789, you would select 1 as
Start At, select 4
for
How Many.
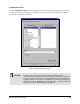
10. Click on
Add to add the information to the filter.
!You should see (1,4) in the text box on the right. This indicates a consecutive 4-digit
number, starting at 1 and represents the “1234” in the sample barcode.
11. Then select 7 as
Start At, select 3 for How Many.
12. Click on
Add to add the information to the filter.
! You should see (7,3) added to the text box on the right. This indicates a 3-digit
consecutive number starting at 7 and represents the “789” in the bar code.
!These settings produce the 1234789 filtered barcode.
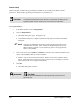
13. Click
OK.
!The Scanner dialog box will close and you will return to the Configuration menu.
14. Refer to Online Help for additional information.
" NOTE Once you have defined a filter for the barcode in the Setup Scanner dialog box,
the filtered barcode needs to be associated with a dispensing program so that
FmNT knows which program to run based on the filtered barcode scanned. Refer
to Online Help for details.