
Instruction Manual


3-18 Tour of Fluidmove
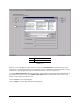
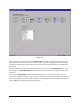
Teach Window
The Teach Window includes the Dispensing Elements Toolbar, a message area with instructions for the
user, a camera video display of the dispensing area, command buttons for teaching locations, X-Y-Z
Position Controls for moving the dispensing head, and a dialog box section that changes depending on
the selected dispensing command. For example, the Teach Window that opens for programming a
Weight-Control Line has a different dialog box than the Teach Window for programming an Area Fill.
The options available will be specific to the dispensing element selected.
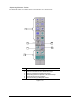
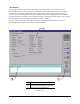
The X-Y-Z Position Controls (shown in Figure 3-14) in the Teach Window are identical to the Position
Controls on the front Control Panel, on systems with Control Panels, and the Position Controls in the Jog
Commands dialog box (see Figure 3-7). To move the dispensing head forward, backward, left or right,
click on one of the arrows. To move the dispensing head up or down, click on the Z-Axis control box
next to the down arrow, then click on either the up or down arrow.
Clicking on the lightning bolt in the center and then one of the direction arrows moves the dispensing
head in the same manner as clicking on the double arrows in the Jog Commands.
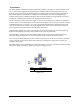
The Target Box is a model of the entire dispensing area. It has a crosshair that represents the current
location of the dispensing head. You can move the dispensing head by moving the crosshairs.
Also, FmNT has “Point and Click” position control which allows you to point to a position on the video
overlay, click the mouse button and the camera will move to that point in one motion, centering the
crosshairs on the point.
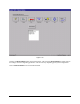
The Teach Window for programming a line is shown in Figure 3-15. Notice the Instruction Message Box.
Instructions appear in this area to guide you during the teaching process.
Item Description
1 Z-Axis Control Box
Figure 3-14
1