
Instruction Manual


8-18 Beginning Programming
To program an arc:
1. Perform the Programming Setup procedure in the Setup and Configuration section of this
manual, then return here.
> Load Side 1 of the Tutorial Board.
> When you create the Workpiece, define the Workpiece Alignment.
> Choose
No Fiducials.
2. Click on
Dispensing Elements from the Program Commands toolbar.
3. Click on
Arc on the Dispensing Elements toolbar.
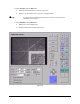
4. Select the method (S,M,E or Center) for teaching the arc.
5. Use the Position Controls to move the dispensing head to the arc start point.
6. Click on
Teach.
7. Do one of the following:
> If using the S,M,E method, use the Position Controls to move the dispensing head to the
arc middle point.
> If using the Center method, use the Position Controls to move the dispensing head to the
center of the arc.
? NOTE Remember, if using the Center method, the center of the arc is actually the center
of the circle that the arc is a part of. Also, you need to fill in the
Degrees value.
This value is the number of degrees of a complete circle that the arc will
complete.
8. Click on
Teach.
> If using the Center method, your arc is complete. Go to Step 12.
9. Use the Position Controls to move the dispensing head to the arc end point.
10. Click on
Teach.
11. Click on
Done.
12. In the Programming Window, select
Dry Run from the Run menu.
> The dispensing head will move after your response.
> Watch to see the camera trace the path of the arc.
13. Select
Wet Run from the Run menu.
> Watch as the arc is dispensed.
> Examine the board for quality and accuracy.
This concludes the tutorial on Arcs.