
Instruction Manual


8-14 Beginning Programming
To program dots:
1. Perform the Programming Setup procedure in the Setup and Configuration section of this
manual, then return here.
> Load Side 1 of the Tutorial Board.
> When you create the Workpiece, define the Workpiece Alignment.
> Choose
No Fiducials.
2. Click on
Dispensing Elements from the Program Commands toolbar.
3. Select
Dot from the Dispensing Elements toolbar.
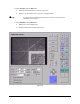
4. Use the Position Controls to move the camera crosshairs to the center of the dot in the upper
left-hand corner (ULHC) of the Dots pattern on the Tutorial Board.
5. Click on
Teach.
6. Use the Position Controls to move the camera crosshairs to the center of the second dot along
the top row of dots.
7. Click on
Teach.
8. Repeat the previous 2 steps for the remaining dots along the top row of dots.
9. Once you have finished programming all of the dots along the top row of dots, use the
Position Controls to center the camera crosshairs on the first dot in the LLHC of the bottom
row of dots.
10. Choose
Type 2 in the Dot Style text box in the area below the video display, then teach the
location of each dot along the bottom row of dots on the Tutorial Board.
11. Click on
Done when you have defined each dot.
12. Select
Edit Dot Parameters from the Edit menu.
13. For an approximate 30 mil dot, set the Dot Parameters for
Type 1 to:
Settling Time: 0
Down Speed: 2 in/sec
Down Acceleration: 300 in/sec
2
Valve-On Time: 0.070 sec
Dispense Gap: 0.015 in
Number of Shots: 1
Dwell Time: 0.030 sec
Retract Distance: 0.250 in
Retract Speed: 3 in/sec
Retract Acceleration: 300 in/sec
2
Suckback: 0.000
14. Move the cursor to
Type 2 in the Dot Parameters dialog box.