
Instruction Manual


7-8 Programming Basics
To teach a model fiducial:
1. In the Main Window, click on
Teach a Program.
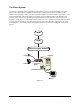
2. Load the Tutorial Board (Side 1) as follows, depending on the type of material handling
option your system has:
A. For systems equipped with conveyors, set the Tutorial Board (Side 1) at the mouth of the
conveyor. Use the dispensing system Conveyor Controls to set the proper width. Choose
Manual Load Board from the Setup menu or click on the Load Board icon.
> The board will be loaded into the dispensing area. The clamps should push the board
up to the rails.
B. For gantry dispensing systems, place the Tutorial Board (Side 1) in the dispensing area
and lock down with the tooling pins.
3. Click on
Main in the toolbar to return to the Main Window.
4. Click on
Configuration.
5. Select
Setup Workpiece Alignment.
6. In the Workpiece Alignment dialog box, select
Learn Workpiece Angle first
and Two
Fiducials
.
7. Click on OK.
8. In the Main Window, click on
Teach a Program.
9. In the Programming Window, click on
File and select New or click on the Program Wizard
icon.
> The Create Workpiece dialog box opens.
10. Select
Two Fiducials.
11. Click on
OK.
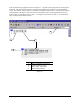
> The Teach Window opens asking you to “Teach first point defining axis”.
12. Using the Position Controls, move the dispensing head to the beginning of one of the Basic
Lines and click on Teach.
13. Using the Position Controls, move to the end of the same line and click on
Teach.
> The points must be defined along the same X-axis, such as along a silk-screened line. By
defining these points, you have defined the X-axis of your workpiece. The further apart
the points are, the more accurately your X-axis will be defined.
> You are then asked to “Teach workpiece origin.”
> The workpiece origin is the point you want the system to define as (0,0), and will be the
starting reference point when positioning dispensing commands and patterns on the
workpiece. It can also serve as the location for the first fiducial if you choose.