
User Manual

6-42 Setup and Configuration
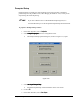
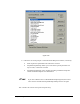
6. From the Production Window, click on Setup, then click on Prompted Setup.
> A Teach Window opens.
7. Make sure that the dispensing area is clear of obstacles.
8. Click on Next to continue.
The dispensing head will move after your response.
> The dispensing head Finds Home and moves to an area behind the service
stations.
9. Change the plastic cups inside the Purge and Weigh Stations as prompted.
10. Click on Next to continue.
11. Check to make sure the purge boot is clean, or change it if necessary.
> Refer to the Maintenance section of the Operations Manual for instructions
on changing the purge boot, if necessary.
12. Click on Next to continue.
The dispensing head will move after your response.
13. Install a new Needle and Shield. (The Shield is an optional feature for cooling the
dispensing fluid.)
14. Click on Next.
> If Calculate Master Offsets is selected in the Needle Setup Parameters dialog
box, see Figure 6-1, then FmNT prepares to perform a Find Needle XYZ
procedure next.
> If Valve Offsets is selected in the Needle Setup Parameters dialog box, then
FmNT prepares to perform a Valve Offsets procedure next.
15. Click on Done to prepare for either the Find Needle XYZ or the Valve Offsets
routine.
> For Find Needle XYZ, refer to the Calculate Master Offsets tutorial earlier in
this section for assistance, if necessary.
> For Valve Offsets, refer to the Valve Offsets tutorial earlier in this section for
assistance, if necessary.
16. Once the Find Needle XYZ or Valve Offsets procedure is complete, you will be
asked to test the vacuum at the Purge Station. Test the vacuum by placing your
finger over the purge boot opening to detect suction.
> If no suction is detected, contact Asymtek Technical Support.
17. Click on Next.
> The Operator Name dialog box opens.
18. Type in your name.