
User Manual


6-32 Setup and Configuration
40. Click on Teach.
41. Use the Position Controls to center the camera crosshairs on a second point around
the circumference of the opening.
42. Click on Teach.
43. Use the Position Controls to center the camera crosshairs on a third point on the
circumference of the opening.
44. Click on Teach.
> The dispensing head moves to the side of the Weigh Station and asks you to
teach a location on top of the Weigh Station lid for a height sense
measurement.
45. Use the Position Controls to center the camera crosshairs on a location on top of the
Weigh Station lid for a height sense measurement.
46. Click on Teach.
> The dispensing head performs a height sense in the defined location, then
lowers the needle tip into the Weigh Station opening.
47. Click on Done.
> A new Teach Window opens asking you to place a sample substrate on top of
the Needle Sensor and select a dot style.
48. If a sample substrate is not already in place on top of the Needle Sensor, place one
there now.
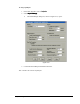
49. Select a dot style.
> You can create different dot styles by assigning specific values to
configurable dot parameters. Click on Edit to view all available dot parameters.
Refer to the Online Help for parameter definitions.
> Refer to the Online Help for tips on using the Verification Step
Verification StepVerification Step
Verification Step.
50. Click on Next.
> A message box opens asking if you want to “reteach substrate corners.”
51. Click on Yes.
52. Use the Position Controls to center the camera crosshairs on the upper left-hand
corner of the sample substrate.
53. Click on Teach.
54. Use the Position Controls to center the camera crosshairs on the lower right-hand
corner of the sample substrate.
55. Click on Teach.
> The dispensing head moves to the Purge Station and performs a purge, then
moves to the Needle Sensor and dispenses four dots on the sample substrate.
56. Use the Position Controls to align the camera crosshairs with the first dot, if
necessary.
57. Click on Teach.