
User Manual


6-26 Setup and Configuration
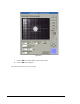
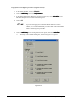
21. Click on Run next to 4. Calculate the needle-to-Height Sensor Z offset
4. Calculate the needle-to-Height Sensor Z offset4. Calculate the needle-to-Height Sensor Z offset
4. Calculate the needle-to-Height Sensor Z offset.
?NOTE This step varies depending on your system valve and Height Sensor
configuration. If your system is equipped with a single valve and no Height
Sensor, this step will be greyed-out and inactive. If your system is equipped
with a Dual-Action dispensing head and no Height Sensor, this step will be
called “Calculate Z of Valve 2 relative to Valve 1.”
> A Teach Window opens. The dispensing head moves to a Safe Z Height. The
Height Sensor probe drops.
22. Check to make sure that the probe tip is lower than the needle tip.
> If the probe tip is not lower than the needle tip, refer to the Height Sensor
section of the Operations Manual for probe height adjustment instructions.
23. Use a soft cloth to wipe the needle tip clean of any residual fluid.
24. Click on Next.
The dispensing head will move after your response.
25. Do one of the following, depending on the type of Needle Sensor installed on your
system:
a. For NSZ Series Needle Sensor, use the Position Controls to align the Height
Sensor probe with the Load Cell on top of the Needle Sensor.
b. For NS Series Needle Sensor, use the Position Controls to align the Height
Sensor probe with the white dot on top of the Needle Sensor.
> If you are not sure what type of Needle Sensor is on your dispensing
system, refer to the Needle Sensor section of the Operations Manual for
help.
26. Click on Teach.
27. Use the Position Controls to align the needle tip with the same circle or with the
Load Cell, depending on your type of Needle Sensor.
> For NSZ Series Needle Sensor, DO NOT TOUCH THE LOAD CELL with
the needle tip. Center the needle tip over the Load Cell.
> For NS Series Needle Sensor, TOUCH THE NEEDLE TIP TO THE
SUBSTRATE.
28. Click on Teach.
The dispensing head will move after your response.
> The dispensing head automatically performs a height sense.
29. Click on Done to accept the results.
> The Teach Window closes and you return to the Setup dialog box. Notice that
the box next to number 4 now has an X in it to indicate that Step 4 has been
completed.
30. Click on Run next to 5. Calculate the needle-to-camera XY offset
5. Calculate the needle-to-camera XY offset5. Calculate the needle-to-camera XY offset
5. Calculate the needle-to-camera XY offset.