
User Manual


Setup and Configuration 6-21
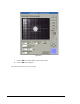
14. Use the Position Controls to move the needle tip very slowly into the entrance of
the Needle Sensor slot until the green LED on top of the sensor turns ON as shown
in the on-screen prompt.
> If the LED does not turn ON, lower the needle tip further into the slot.
> Refer to the Needle Sensor section of the Operations Manual for help locating
parts, if necessary.
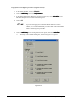
15. Click on Teach.
16. Use the Position Controls to move the needle tip very slowly around the corner of
the Needle Sensor slot until the green LED turns ON again.
17. Click on Teach.
18. Use the Position Controls to move the dispensing head to the Weigh Station
location.
19. Activate the Z-axis controls and lower the dispensing head until the needle tip is
flush with the top of the Weigh Station lid.
20. Click on Teach.
21. Use the Position Controls to move the dispensing head to the Purge Station
location.
22. Activate the Z-axis controls and lower the dispensing head until the needle tip is
flush with the Purge Station boot.
23. Click on Teach.
The dispensing head will move after your response.
24. Do one of the following, depending on the type of Needle Sensor installed on your
system:
a. For NSZ Series Needle Sensor, use the Position Controls to align the Height
Sensor probe with the Load Cell on top of the Needle Sensor.
b. For NS Series Needle Sensor, use the Position Controls to align the Height
Sensor probe with the white dot on top of the Needle Sensor.
> If you are not sure what kind of Needle Sensor is installed on your
system, consult the Needle Sensor section of the system Operations
Manual.
25. Click on Teach.
The dispensing head will move after your response.
> The dispensing head automatically performs a height sense.