
User Manual


6-20 Setup and Configuration
To perform a Calculate Master Offsets procedure:
Follow all on-screen prompts.
1. In the Main Window, click on Configuration.
2. Click on Needle Setup
Needle SetupNeedle Setup
Needle Setup, and select Setup Parameters
Setup ParametersSetup Parameters
Setup Parameters.
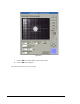
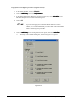
> The Needle Setup Parameters dialog box opens. See Figure 6-1.
3. Select Calculate Master Offsets
Calculate Master OffsetsCalculate Master Offsets
Calculate Master Offsets in the Machine Setup Process section of the dialog box.
?NOTE If you are changing from Valve Offsets to Calculate Master
Offsets, it is recommended that you exit FmNT and restart FmNT
before continuing this procedure.
4. Click on OK.
5. Click on Needle Setup
Needle SetupNeedle Setup
Needle Setup on the Configuration menu again, and select Calculate Master
Calculate MasterCalculate Master
Calculate Master
Offsets
OffsetsOffsets
Offsets.
> A Teach Window opens asking you to clear the work area.
6. Make sure that the work area is clear and free of any obstacles so the dispensing
head does not collide with anything when it moves.
The dispensing head will move after your response.
7. Click on Next.
8. Check to make sure that the Height Sensor probe tip is lower than the needle tip as
shown in the on-screen prompt.
> If it is not, rotate the Height Sensor Micrometer until the probe is lower. Refer
to the Height Sensor section in the dispensing system Operations Manual for
more information.
9. If necessary, use a tissue to clean any dripping fluid from the needle tip.
10. Click on Next.
11. Activate the Z-axis controls for the Position Controls and raise or lower the
dispensing head to a Safe Z-axis height that assures that the head will not
encounter obstacles while traveling anywhere across the dispensing area.
12. Click on Teach to record the height.
13. Answer “YES” to the question, “Would you like to re-teach the beam locations?”
> Choosing “YES” means that you will re-teach the needle location in the XYZ
planes using the Needle Sensor.
> Choosing “NO” means that the previously recorded values are used and this
step is skipped.