
User Manual


Advanced Programming 9-19
80. Choose Done.
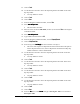
> Your program will look like this:
1 MEASURE FLOW RATE
2 LOOP PASS: FROM 1 TO 3
3 DO MULTIPASS: U-pass AT (x
1
, y
1
)
4 NEXT LOOP:
5 END:
81. Place the cursor on NEXT LOOP.
82. Click on Pattern on the Program Commands toolbar, and select Place Pattern
Place PatternPlace Pattern
Place Pattern.
83. In the Teach Window, select U-pass in the Available Patterns
Available PatternsAvailable Patterns
Available Patterns text box.
84. Use the Position Controls to center the camera crosshairs on the ULHC of the
second flip chip model in Pattern 3 on the Tutorial Board workpiece.
85. Click on Teach.
86. Use the Position Controls to center the camera crosshairs on the ULHC of the
remaining two flip chip models in Pattern 3 on the workpiece.
87. Click on Done when you have finished teaching the last two flip chips.
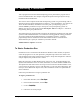
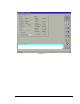
> You program will look like this:
1 MEASURE FLOW RATE
2 LOOP PASS: FROM 1 TO 3
3 DO MULTIPASS: U-pass AT (x
1
, y
1
)
4 DO MULTIPASS: U-pass AT (x
2
, y
2
)
5 DO MULTIPASS: U-pass AT (x
3
, y
3
)
6 DO MULTIPASS: U-pass AT (x
4
, y
4
)
7 NEXT LOOP:
8 END:
88. From the File menu, select Save
SaveSave
Save.