
User Manual


9-18 Advanced Programming
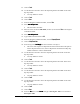
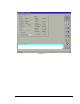
> Your program should look like this:
1 START PASS: FOR PASS 1
2 FIND SUBSTRATE HEIGHT:(x, y)
3 WEIGHT CONTROL:30.00,1,([x
1
,y
1
],[x
2
,y
2
])
4 RESET MULTIPASS TIMER:
5 END PASS:
6 START PASS: FOR PASS 2
7 AWAIT MULTIPASS TIMER: 20 seconds(s)
8 WEIGHT CONTROL:30.000,1,([x
1
,y
1
],[x
2
,y
2
])
9 RESET MULTIPASS TIMER:
10 END PASS:
11 START PASS: FOR PASS 3:
12 AWAIT MULTIPASS TIMER: 20 second(s)
13 WEIGHT CONTROL:80.000,1,(x
1
,y
1
),(x
2
,y
2
),(x
3
,y
3
),(x
4
,y
4
)
14 END PASS:
15 END:
69. In the Pattern Name text box, select Workpiece to return back to the Workpiece
program.
> A message box opens indicating that the dispensing head is about to move to
the “Workpiece” origin.
The dispensing head will move after your response.
70. Click on OK.
71. Place the cursor on
END.
72. From the Program Commands toolbar, click on Process and select Measure Flow Rate
Measure Flow RateMeasure Flow Rate
Measure Flow Rate.
73. To set up for placing the pattern U-pass, click on Pattern on the Program
Commands toolbar.
74. Select Loop Block
Loop BlockLoop Block
Loop Block and type in 3 for the three passes (U-shaped line and two seal
passes) in U-pass.
75. Place the cursor at
Next Loop.
76. Click on Pattern on the Program Commands toolbar, and select Place Pattern
Place PatternPlace Pattern
Place Pattern.
77. In the Teach Window, select U-pass in the Available Patterns
Available PatternsAvailable Patterns
Available Patterns text box.
78. Use the Position Controls to center the camera crosshairs on the ULHC of the first
flip chip model in Pattern 3 on the Tutorial Board workpiece.
79. Click on Teach.