
User Manual

8-26 Beginning Programming
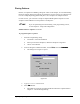
37. Click on Teach.
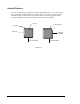
38. Use the Position Controls to center the camera crosshairs on the ULHC of the
adjacent Flip Chip 2.
> The pattern will also be placed at this location.
39. Click on Teach.
40. Click on Done.
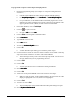
> Your program should look like this:
1 DO: FCLine1 at (0.348, 0.429)
2 DO: FCLine at (0.546, 0.356)
3 END
> Your location numbers may vary from this example.
41. Select Dry Run
Dry RunDry Run
Dry Run from the Run
RunRun
Run menu.
> Watch to make sure that the program goes through the following steps:
· Locate Fiducials 1 (ULHC) and 2 (LRHC) of the Workpiece.
· Locate Fid 1 (ULHC) of Flip Chip 1.
· Locate Fid 2 (LRHC) of Flip Chip 1.
· Locate Fid 1 (ULHC) of Flip Chip 2.
· Locate Fid 2 (LRHC) of Flip Chip 2.
· Dry dispense L-shaped line starting at Fid 1 on Flip Chip 1.
· Dry dispense L-shaped line starting at Fid 1 on Flip Chip 2.
42. Select Wet Run
Wet RunWet Run
Wet Run from the Run
RunRun
Run menu.
> Watch as the pattern is dispensed in both locations.
> Examine the board for quality and accuracy.
This concludes the tutorial on Placing Patterns.
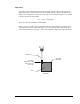
Function call to
dispense the line
FCLine1 at this
x
,y location