
User Manual

Beginning Programming 8-25
18. Click on OK.
The dispensing head will move after your response.
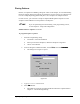
19. Select Edit Line Parameters
Edit Line ParametersEdit Line Parameters
Edit Line Parameters from the Edit
EditEdit
Edit menu and check to make sure that the Line
Parameters for Style 1 match those values established earlier in the tutorial for
Weight Control lines.
20. Click on Dispensing Elements in the Program Commands toolbar.
21. Click on Weight-Control Line.
22. Enter 20 mg in the weight text box and choose Style 1.
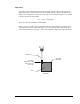
23. Use the Position Controls to center the crosshairs on the ULHC of Flip Chip 1.
24. Click on Teach.
25. Use the Position Controls to center the crosshairs on the URHC of Flip Chip 1.
26. Click on Teach.
27. Use the Position Controls to center the crosshairs on the LRHC of Flip Chip 1.
28. Click on Teach.
29. Click on Done.
> A message box opens, indicating the calculated line speed for the newly
created weight control line.
30. Click on OK.
> You have defined an L-shaped line around Flip Chip 1.
> Your FCLine1 program should look like this:
1 WEIGHT CONTROL: 20.000, 1, ...
2 END
31. In the Programming Window, select “Workpiece” from the Pattern Name text box.
> A message box opens indicating that the dispensing head is “About to move
to Reference Origin of Workpiece.”
32. Click on OK.
33. Click on Dispensing Elements from the Program Commands toolbar.
34. Click on Pattern on the Dispensing Elements toolbar.
35. In the Available Patterns text box in the lower portion of the Teach window, select
FCLine1.
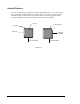
36. Use the Position Controls to center the camera crosshairs on the ULHC of Flip
Chip 1.
> This will be where you will place your pattern.