
User guide


Maintenance and Service 25
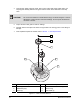
Cleaning the Flow Meter
1. Soak the shims, gears, and bottom-half casing in solvent and clean with a nozzle bristle
brush.
CAUTION! Do not expose the electrical connector to solvents as this can damage the gasket
and connector and cause electrical problems.
2. Carefully clean the top-half casing, making sure the electrical connector is not exposed to any
solvent.
3. Inspect the cleaned parts for cleanliness and repeat the above cleaning steps if needed.
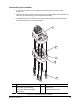
Reassembling the Flow Meter
1. Place the bottom-half casing with gear shafts facing upwards.
2. Using the plastic tweezers, gently pick up one shim at a time and allow one shim to freely fall
down to the bottom of each gear shaft.
3. Find the letter markings on each of the two gears, then using fingers allow gears with the
markings facing down to drop down on each gear shaft.
4. Using the plastic tweezers, gently pick up the remaining shims and carefully install one on
each gear shaft.
5. Carefully install the Teflon O-ring without twisting it into the oblong groove of the bottom-half
casing until evenly seated.
6. Install the top-half casing by aligning the eight holes with the bottom-half casing making sure
not to disturb the Teflon O-ring.
"NOTE Do not apply Loctite to the eight screws.
7. Install the eight screws and lightly finger-tighten each of the screws.
8. Using a torque wrench, alternately torque each screw at opposite places to 35 Newton-meter.
9. Verify free rotation of the gears by gently spinning them with a non-metallic pin inserted
through the threaded holes. If not spinning freely, correct the condition.
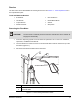
Reinstalling the Flow Meter:
1. Install the assembled flow meter to the fluid line by following the instructions in Section 3 -
Installation.
2. Connect the female connector on the FMS cable to the four-prong male connector on the top
of the flow meter and tighten the screw.