
User guide

Installation 13
Installing the DriverLINX Software
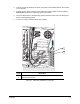
1. Power on the dispensing system as specified in the C-740/C-741 Installation, Operations,
and Maintenance Manual.
2. If the ECNT/ECXP software opens, close it.
3. Insert the DriverLINX software CD in the CD-ROM drive.
4. Click the Start button on the Windows Explorer Taskbar and then click on Run.
5. Click on Browse and select D:\Drivers\Keithley\setup.exe to execute the installation
procedure.
6. Follow the on-screen prompts and accept the default answers.
! The program will be installed into the default directory (C:\DrvLINX4).
7. After the installation is complete, close all open programs and exit Windows.
8. Power down the computer by turning it to the OFF (0) position.
9. You are now ready to configure the DriverLINX software.
Configuring the DriverLINX software
1. Power on the dispensing system as specified in the C-740/C-741 Installation, Operations,
and Maintenance Manual.
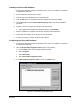
2. Open the DriverLINX Configuration Panel (
Figure 3-5) as follows:
a. Click the Start button on the Windows Explorer Taskbar.
b. Select Programs.
c. Select DriverLINX.
d. Select DriverLINX Configuration Panel
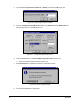
3. In the DriverLINX Configuration Panel, click on the Create button.
Figure 3-5 DriverLINX Configuration Panel