
User guide

8 Installation
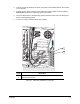
Installation
Installing the Computer Interface Board
CAUTION! Use proper Electrostatic Discharge precautions when handling the Computer
Interface Board and the CPU units. Failure to do so may cause irreversible
damage.
1. Perform a service shutdown as specified in the C-740/C-741 Installation, Operations, and
Maintenance Manual.
2. Open the lower cabinet doors to the dispensing system.
3. Disconnect the cables from the computer.
! Label the cables for reinstallation reference.
4. Open the computer case to gain access to the PCI slots and locate a vacant PCI slot in the
computer.
5. Install the interface board into the vacant PCI slot ensuring proper contact with the I/O multi-
pin socket facing outwards.
6. Using a screwdriver, secure the interface board with the existing or a provided screw.
7. Close the computer case and properly reconnect the previously removed cables as labeled.
8. Close the lower cabinet doors to the dispensing system.
9. You are now ready to install the flow meter and cables.
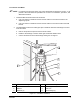
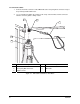
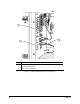
Installing the Flow Meter and Cables
Install the flow meter, cable, fittings, and hoses as follows: (Figures 3-1 through 3-4):
WARNING! Health hazardous solvents or coating material may be present in the fluid lines.
Failure to use Personal Protective Equipment as stated in the applicable MSDS
may result in serious bodily harm to the user.
CAUTION! Avoid accidental spills of any hazardous material during installation that could
damage the Dispensing System or facility floor. Use PPE and a suitable
collection container and shop rag. Dispose of properly.
"
NOTE To protect the interior of the flow meter, do not remove the two plastic protective caps from
the flow meter until final installation.