
Manual


4-34 Configuration and Characterization
4.15.3 AutoStart
The AutoStart feature allows ECXP to start production without operator intervention. The AutoStart
Delay Timer starts when ECXP finishes loading and prevents production from starting until the timer runs
out, giving the operator a chance to cancel the AutoStart.
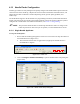
To enable AutoStart and set a delay:
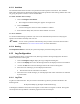
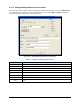
1. Click on
Configure > Production.
The Configure Production dialog box appears. See Figure 4-29.
2. Click on
AutoStart.
A check mark appears in the box when AutoStart is enabled.
3. In the AutoStart Delay field, enter the desired number of seconds.
To cancel AutoStart:
To cancel AutoStart during a production run, click on the AutoStart Delay timer box overlaying the
Operator Screen before the delay timer runs out.
NOTE You can create a procedure called Startup. This procedure will execute when ECXP is
loaded. Refer to 5.6.1 Reserved Procedures for more information.
4.15.4 Homing
If Prompt Before Home is selected, the system will prompt you before homing the robot.
4.16 Log Configuration
Log Configuration allows you select the Event, Warning, and Error messages displayed on the Event
Monitor and written to the log file.
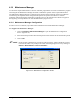
1. Click on
Configure > Log to display the Log Configuration dialog box.
2. Click on the
Display tab to select the messages that will be displayed on the Event Monitor.
3. Click on the
File tab to select the messages that will be written to the log files.
4. Select the level of message you want displayed and written.
The selected level has a black dot in the button.
5. Select the sources of the messages you want displayed and written. Selections are indicated
by check marks.
4.16.1 Log Files
Log files are ASCII text files. They are written to the ECW\Log directory and have filenames in the
following form:
ECWyearmonthday.log (Example: ECW20100618.log)
At midnight (12:00PM or 24:00) the current log file is closed and a new log file is created. The log files
can be imported into spreadsheet or database programs for statistical analysis.