
Manual


Configuration and Characterization 4-19
4.8 Inverter Configuration
NOTE You may configure the Inverter through the Conveyor Configuration dialog box or
through the Reconfigure function. The recommended method is through the Conveyor
Configuration dialog box. If you use the Reconfigure function, all conveyor settings are
reset to the factory defaults. You will need to restore any customized settings. The
following procedure uses the Conveyor Configuration dialog box. The Reconfigure
method is detailed in 4.14 Reconfiguring System Hardware.
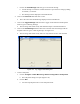
To configure the Inverter:
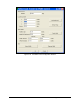
1. Click on
Configure > Conveyor Settings from the ECXP Edit Screen.
The Conveyor Settings dialog box shown in Figure 4-18 opens.
2. Enter the desired values.
See Table 4-2 for a description and default value for each property.
3. Click
OK when done.
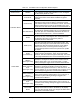
Table 4-2 Inverter Settings
Property Description Default Value
Invert Move 1
Distance to move the board into the inverter. This move is
used when the inverter is upstream and must be a negative
value.
-39 in.
Invert Move 2
Distance to move the board upstream after it passes the
fixture sensor. This move is only used when the inverter is
downstream. This move is a safety factor to prevent damage
to the board and must be a negative value.
-1.2 in.
Inverter Time Out
Time to wait for the board to be sent to the inverter and return.
The timeout counter starts when the conveyor sends the
board to the inverter. If the inverted board fails to load into the
fixture before the timeout interval expires, production stops
and the "Board Failed To Load" error message appears.
15 sec.
Inverter Type Settings are Upstream or Downstream. Upstream