
Manual


Programming 5-39
Exercise 5-5: Creating a Program with Graphic Display
1. Open the ECXP Edit Screen and click on
View > Product Program to make sure you are in
the product program view.
2. Click on
New or select File > New Product Program from the menu bar.
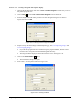
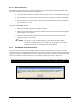
3. Enter the length and width of the product in the New Program dialog box as shown in
Figure 5-44 and click
OK.
Figure 5-44 Entering Product Length and Width
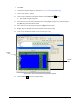
4. Import and crop the board image entitled Sample12.jpg. See 5.13.3 Importing Images and
5.13.4 Cropping Images.
If your ECXP program has been installed using the program defaults, this file will be
located in the C:\Program Files\ECXPXX\Programs directory.
The image should be displayed at the bottom of the screen. See Figure 5-43.
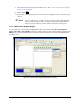
5. Click on the
Create Pattern button.
The New Pattern dialog box opens.
6. Enter “Side 1” for the pattern name. See Figure 5-45.
Figure 5-45 Creating a Pattern