
Manual


Programming 5-25
5.9.6 Creating a Mask Region
To create a Mask Region:
1. Start ECXP and select
Edit > Edit Mode to open the Edit Screen.
2. Make sure the desired product program is open. If not, open it.
3. Highlight the pattern where you want to create a Mask Region.
4. Click on the
Create Mask Region button on the toolbar.
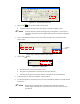
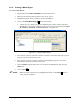
A mask region is created in the pattern's Mask Regions section, with the name New
Mask Region. The current coordinates of the active tool tip are entered into the
Corner
1X, Corner 1Y, Corner 2X
, and Corner 2Y fields. See Figure 5-27.
Figure 5-27 Creating a Mask Region
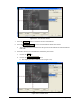
5. Move the active tool tip or camera crosshairs to the first corner of the mask region you are
going to create and teach the first corner.
6. Move the active tool tip or camera crosshairs to the diagonally opposite corner of the
desired mask region and teach the second corner.
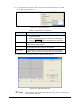
7. Select the
Name property field. Enter a new name for the Mask Region, then press the
[
Enter] key.
8. Click on
Save .
NOTE Make sure the new mask regions is highlighted and click on the GoTo button to
verify position coordinates.