
Manual


5-24 Programming
Exercise 5-3: Creating a Pattern and Inserting Program Instructions
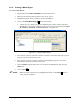
1. Create a new product program as described in 5.9.1 Creating Product Programs.
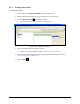
2. Create a new pattern named “Rectangle” as described in 5.9.3 Creating a Pattern.
3. Make sure the Rectangle pattern is highlighted. If not click on it.
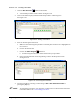
4. Click on the Conformal Coating tab and then on the
Area Coat button.
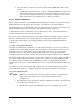
5. Move the tool or camera crosshairs to the starting point of the rectangle and click the
Teach
button in the Edit Window if using an applicator or the Teach button in the Camera
Window if using the camera.
Note that the
Begin X and Begin Y textboxes on the right of the screen contain starting
point coordinates.
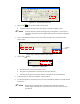
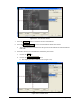
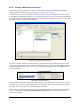
6. Move the tool or camera crosshairs to the ending point of the rectangle and click the
Teach
button in the Edit Window if using an applicator or the Teach button in the Camera
Window if using the camera.
The ending point should be diagonally across from the beginning point.
Note that the
End X and End Y textboxes on the right of the screen contain end point
coordinates. See Figure 5-26.
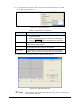
7. Test the pattern by selecting it and clicking on
Run > Run Pattern/Procedure or by
pressing the [
F6] key.
NOTE To include the pattern in your program, you must enter a Place Pattern
instruction in the Main Pattern. See 5.9.9 Placing Patterns.
Figure 5-26 Creating the Rectangle Pattern