
Instruction Manual

Programming 5-19
4. To change coordinates, move the tool tip to the pattern starting point and click the
Teach Field button. Teaching the first set of coordinates activates the second set,
if required. See 5.9.3.2 Teaching Coordinates with the Camera to teach instruction
coordinates with the camera.
5. Complete the Property section and click on
Save .
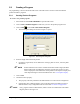
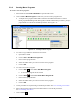
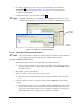
NOTE Highlight the pattern to see the pattern properties. Highlight the instruction to see the
instruction properties. Refer to Appendix B for a description of all instruction properties.
Figure 5-18 Pattern and Instruction Properties
5.9.3.2 Teaching Coordinates with the Camera
NOTE The camera teaches coordinates for existing instructions. Insert the coating instructions
for the appropriate tools and then update the coordinates with the camera.
To teach coordinates using the camera:
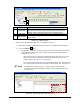
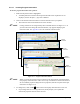
1. Make sure the pattern name is selected and click on the desired instruction.
Note the position of the arrows (->) next to the coordinates in the instruction properties.
The arrows indicate which coordinate will be taught when you click the
Teach button in
the camera window.
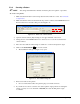
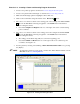
2. Press [F4] to open the camera window.
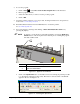
3. Move the camera over the position that you want to teach.
The reticle in the camera window represents the characterized pass width for the active
tool.
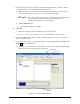
4. Once the camera cross hairs are centered as desired, click the
Teach button in the camera
window.
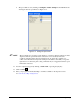
For instructions with more than one coordinate, clicking the
Teach button in the camera
window will teach the position indicated by the arrows and then move the arrows to the
next position. For example, if the arrows are at "Begin X" and Begin "Y", that position
will be taught and the arrows will then move to "End X" and "End Y".
Instruction
Properties
Pattern
Properties