
User guide


4-22 Configuration and Characterization
4.13 Bar Code Scanner Configuration
Bar code scanners can be used to load product programs. If your system is equipped with the optional bar
code scanner, you will need to perform a scanner configuration. For additional information, refer to the
manual for your particular scanner or contact your Asymtek representative.
4.13.1 PSC5312 (Hand-Held) Scanner Configuration
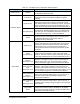
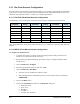
The following is a list of settings for a PSC5312 scanner properly configured for use with ECXP:
Parameter Setting Parameter Setting Parameter Setting
Power Always On Beeper Off Baud Rate 9600
Data Bits 7 Parity Even Stop Bits 1
Char Delay 00 Protocol Ext Trg+ RTS Rcv Rdy+
Scanner ID None Prefix Off Suffix CR/LF
Preamble None Postamble None Redundant Scan Yes
Code IDChar No Labels Unbuffered Label Delay 00
Serial Buffer: Full Timeout: 6 s No Read Msg: Off
If any of the parameters do not match, refer to the PSC5312 User Manual or contact Asymtek Technical
Support.
4.13.2 MS810 (Fixed Mount) Scanner Configuration
To configure the MS810 Scanner:
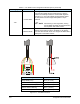
1. Verify that the scanner is properly connected to the appropriate serial port. Refer to the
manual for your particular scanner if necessary.
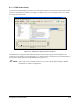
2. Run the Microscan MS710 ESP utility (provided on disk) to configure the MS810 fixed
mount scanner.
3. Click on
Serial Port > Configure.
4. Select the appropriate Scanner port and click on
OK.
5. Click on
Serial Port > Auto Baud.
! The utility tries to communicate with the scanner.
! When communication is established a green box on the bottom of the screen displays
CONNECTED.
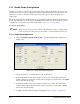
6. Click on the
Menu button.
7. Click on the
Comm Port tab. Make sure the Host Port settings are:
• Baud Rate: 9600
• Parity: Even
• Data Bits: 7
• Stop Bits: 1
• Auxiliary port: Disabled