
Manual

Programming 5-29
5.13.6 Using the Graphics Display for Programming
After you have imported your image, you can use it to create your dispensing program. This is useful
when you are creating programs on a computer that is not connected to a coating system.
To create a program using graphics display:
1. Start ECNT and select
Edit > Edit Mode to open the Edit Screen.
2. Click on
View > Product Program to make sure you are in the product program view.
3. Click on
New or select File > New Product Program from the menu bar.
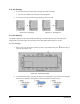
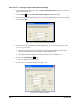
4. Enter the length and width of the product and click
OK.
5. Follow the steps under 5.13.3 Importing Images and 5.13.4 Cropping Images to import and
crop your graphics image.
6. After you have imported your image, you may enlarge it as described in 5.13.5.3 Resizing.
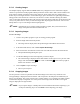
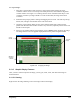
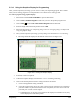
! The image should be displayed at the bottom of the screen. See Figure 5-27.
Figure 5-27 Viewing the Graphic Display
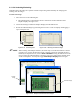
7. If desired, create a new pattern.
8. Undock the Graphics Display as described in 5.13.5.4 Undocking/Redocking.
9. Click on the desired pattern and enter coating instructions as follows:
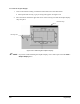
a. Click on the applicable coating command.
b. Using the graphics image, move the cursor to the start point of the area to be coated and
press the <CTRL> key and left-click the mouse. If required, move the cursor to the end
point and press <CTRL> left-click again.
! If Solid Brush is on, the areas to be coated will be displayed in solid blue. If not, they
will be displayed in a blue hatch pattern.