
Manual

Programming 5-25
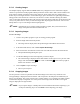
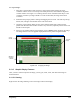
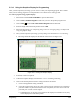
To crop an image:
1. Drag three corner handles to their respective corners of the board, aligning the cursor
crosshairs with the corners. For more precise handle placement, click inside the magnified
crosshair window. See Figure 5-19. Clicking near the corner of the board will snap it to the
crosshairs. Each time you drag a handle to a corner of the board, the image of the board
is redrawn.
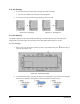
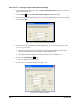
2. Hold down the [Ctrl] key before clicking and dragging the last corner. This will snap the top,
bottom, left, and right center handles to the sides of the board.
3. Check the cropped image. Make sure the vertical and horizontal edges of the board are
parallel with the sides of the window. If there is any distortion, adjust the position of the side
handles in the left pane.
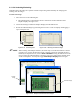
4. When you are satisfied with the cropped image, click on
Done to finish importing the image.
The image fills the area in the graphic display defined as the product length and width.
Figure 5-19 Cropping An Image
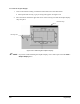
5.13.5 Graphic Display Features
After you have created or imported an image, you may pan, zoom, resize, and undock the image as
described below.
5.13.5.1 Panning
Right-click on the image and drag to move the image around in the display.
Corner
Handle
Cropped
Image
Magnified
Crosshair
Window