
Manual


Programming 5-13
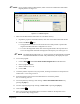
5.9.3 Creating a Pattern
All coating and maintenance instructions must be placed in patterns and procedures.
To create a new pattern:
1. Move the tool tip to the desired origin point of the pattern (preferably at the front left corner
of the board, so all the coordinates are positive).
! The origin point will establish the 0,0,0 coordinates of the pattern for editing and teaching
purposes and should be easily recognized for Step and Repeat purposes.
2. Click on the
Create Pattern button on the toolbar.
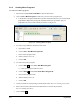
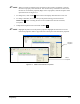
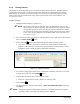
! The New Pattern dialog box (Figure 5-9) opens.
Figure 5-9 New Pattern Dialog Box
3. Enter a new name for the pattern.
! Choose a name that describes the pattern's purpose for future reference.
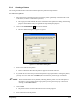
4. If you did not move the tool tip to the desired pattern origin point before creating the pattern,
you may do so now and click on
Teach X, Y to teach the XY pattern origin coordinates.
" NOTE The Z field should be zero by default, indicating that the pattern is in the same plane as
the fixture. You can change the Z origin point by moving the tool tip up or down and
clicking on the
Teach Z button.
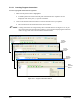
5. Click on
OK.
! The pattern will be created in the Patterns section of the program.
6. Insert instructions into the pattern.