
Manual

Configuration and Characterization 4-25
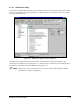
2. Click the Expand Tree button to expand the entire directory tree structure to show all files
and folders in the Product Map.
! When the tree is expanded, the button changes to
Collapse Tree. Use this button to
collapse the entire directory tree.
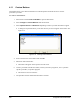
4.10.1 New Group
A group appears as a folder in the Product Map.
To create a new group:
1. Select the Product Map folder.
2. Click on the
New Group button (Figure 4-15) and enter the group name in the New Group
field.
To create a new group inside a group:
1. Select a group folder.
2. Click on the
New Group button and enter the new group name in the New Group field.
4.10.2 New Part
This allows you to assign a logical name to a product program. This is the name the operator sees when
loading a program. When the product program is loaded, the name appears in the Current Product
Window on the Operator Screen.
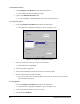
To create a new part:
1. Select a group folder for the part.
2. Click on the
New Part button (Figure 4-15).
3. Enter a name (or part number) in the Part Number field. You can use any combination of
characters or numbers.
4. Click on the
Browse button. Use the Open dialog box to find and select the product program
file you want to assign to the new part, and then click on the
Open button.
! The path and filename appear in the Filename field. The product program will now load
when the name is selected from the Product Map.