
Manual

4-8 Configuration and Characterization
To configure a fixture:
" NOTE Before configuring the fixture, you must configure the Tool Offsets.
Refer to 4.4 Tool Configuration for detailed instructions.
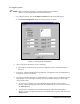
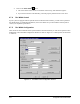
1. To configure a fixture, click on
Configure > Fixtures from the ECNT Edit Screen.
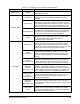
! The
Fixture Configuration dialog box shown in Figure 4-7 opens.
Figure 4-7 ECNT Fixture Configuration
2. Click on the tab for the fixture you are configuring.
! There will be a separate tab for each fixture configured in ECNT. The default fixture is
Fixture A.
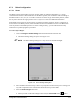
3. If necessary, install the Fluid Dispensing Applicator. The applicator must be installed before
teaching the X and Y coordinates.
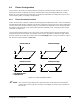
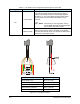
4. Teach each coordinate separately as described below. See Figure 4-8 for coordinate locations.
This example is for a front-right constraint, which is the normal setting for a left-to-right
conveyorized system.
a. To teach the X-coordinate, move the Fluid Dispensing Applicator until the point is
directly over the leading edge of the board (X-coordinate on the Top View) and click on
the
Teach X button.
b. To teach the Y-coordinate, move the Fluid Dispensing Applicator until the point is
directly over the front edge of the board (Y-coordinate on the Top View) and click on the
Teach Y button.