
Installation Owner's manual


Install the
Computer
2
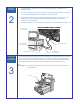
1. Locate the Laptop Computer, remove all packaging material, and place it in the
desired location.
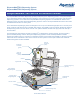
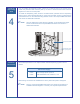
2. Connect the USB 2.0 Cable (P/N 7209541) to the USB Type B connector at the right,
rear of the DispenseMate and to the USB port on the Computer.
3. If the unit is furnished with the Advanced Dispensing Package, connect the RJ-45
Ethernet cable (P/N 7209539) between the laptop and the left, rear Ethernet
connection on the Dispenser.
4. Plug the Computer Power Cable and the Dispenser Power Cable into the facility outlet.
Install and
level the
Tooling Plate
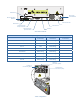
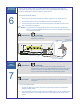
The D-580 Series Dispensing Systems are supplied with Tooling Plates that are adjusted
to ± 0.127 mm of the X-Y Dispense Plate level. To prevent damage during shipping, the
plate is secured with a temporary bracket and screws. Remove the bracket and screws
and replace the screws with the (4) M4 button head screws provided prior to use.
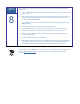
"NOTES The leveling set screws are preset at the factory and in most cases do not
need adjustment.
3
4 Screws
USB 2.0 Connection
Auxiliary USB
2.0 Connection
RJ-45 Ethernet
Connection
RJ-45 Ethernet
Computer Connection
USB Type B Connector