
Manual

Installation
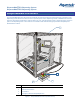
1. Place the Enclosure over the D-55X Dispensing System.
2. Connect the 9-pin and 25-pin connectors on the Control Box to the rear of the D-55X.
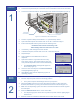
3. Connect the Interlock Cable on the Enclosure to the Interlock Receptacle (Figure 2).
Figure 2 - D-55X Rear View Connections
4. Perform a system startup as described in 2 - System Startup below.
5. Open Windows Explorer and double-click on the file: c:\fmnt\fmconfig.ini.
6. Ensure that the [Misc Parms] section has the following lines:
Enable ACLPlus Interlock Checking = ON
Acknowledge ACLPlus Interlock Clear = ON
7. If necessary, make changes and save the file.
8. In Windows Explorer, double-click on the file: c:\fmnt\fmconfig.dft.
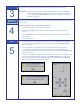
Figure 3 - Interlock Active
1
9. Repeat Step 6.
10. Open Fluidmove and initialize and home the
dispenser.
11. Open the Fluidmove Jog window and move any
axis. During a move, open the Enclosure door and
verify that the dispenser motion ceases immediately.
! The Interlock Active message will appear on
the screen (Figure 3).
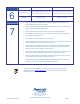
12. Close the door and verify that the Interlock Cleared
message appears (Figure 4).
13. Click OK and verify that the dispensing system is
operating properly.
Figure 4 - Interlock Cleared
System
Startup
2
1. Turn the Main Power Switch on the back of the system to the ON (I) position.
2. Turn the computer power switch to the ON (I) position.
! The system computer should begin the boot up sequence.
3. Check both EMO buttons to see if they have been activated. If either has been
activated, deactivate it by turning the red knob clockwise until the knob pops out.
4. Make sure the dispensing system front door is closed and that the interlock signal is
not interrupted.
5. Press the Start/Continue button on the Control Box.
! The dispensing system should be in a powered-up state and the digital gauges
should be on.
6. Start the Fluidmove software as described in the D-550 Series User Guide.
Control Box
Connections
Interlock Cable
Connection