
Manual


Maintenance 41
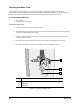
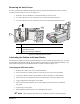
Removing the Axis Covers
In order to perform the remainder of the maintenance procedures described in this section, it will be
necessary to remove the axis covers. See Figure 5-2.
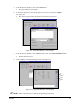
1. Perform a “Service Shutdown” as described in the Operation section.
2. To remove the X-axis cover, loosen the two set screws and slide to the side.
3. To remove the Y-axis cover, remove the two screws at the back and pull it forward.
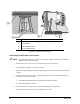
Item Description
1 X-Axis Cover Set Screws
2 Y-Axis Cover Screws
3 Spring Pins (DO NOT REMOVE)
Figure 5-2 Removing the Axis Covers
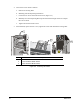
Lubricating the Cables and Linear Guides
The XYZ-Axes support the Dispensing Head and allow it to travel within the dispensing area. To ensure
smooth Dispensing Head movement, the rails and linear guides must be lubricated approximately every
three months. The location of the Mechanical Drive Cables is shown in Figure 5-3.
Lubricating the XYZ-Axis Cables
1. Remove the X and Y axis covers as described above.
2. Move each axis to its home position. (X-axis far left, Y-axis rear, Z-axis upward)
3. Using a new lint-free cloth, wipe all cables to remove old grease or contamination.
4. Move each axis to its opposite end of travel and continue to wipe the cables clean.
5. Apply a light film of cable grease to all cables.
6. Move each axis back and forth over its entire length of travel four times to distribute
the grease.
7. Wipe off any excess grease.
8. When finished, replace the axis covers and tighten the screws.
" NOTE When replacing the X-axis cover, make sure to place it on the spring pins.
2
3
3
1
1