
Manual

32 Operation
Safe Z-Height
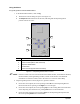
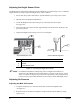
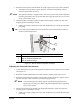
Safe Z-Height is determined by choosing a height that ensures the Needle, Height Sensor, Camera,
Lighting, or any part of the Dispensing Head does not collide with any obstacles while traveling around
the dispensing area.
On the DispenseMate Series Dispensing Systems, the Camera is mounted to the Dispensing Head so that
the Camera moves up and down with the Dispensing Valve. Obstacle avoidance becomes apparent when
using the Camera to program dispensing locations on your workpiece and there are protruding objects on
the workpiece (such as a transformer on a PCB) that are within the X-Y offset of the dispensing location.
Possible damage to the Camera and your workpiece may result.
Z-Axis Positioning
To set different focal lengths during the vision capture process, FmNT allows you to “Enable Z
Positioning”, which establishes different Camera heights for different fiducial searches. The Z Height of
the Camera for each fiducial is taught and saved when the program is created. When the program runs, the
Camera moves to the same taught height before searching for the fiducial.
To enable Z-axis positioning:
1. Select
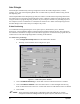
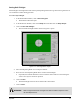
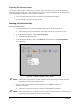
Configuration>Setup Vision from the FmNT Main Window.
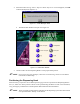
! The Setup Vision Window shown in Figure 4-4 opens.
Figure 4-4 FmNT Setup Vision Window
2. Click on Enable Z Positioning. A check mark in the box indicates the feature is enabled.
3. Click on
Fid Search at Safe Z to have the Camera move to a Safe Z-Height while moving
from one fiducial location to the next. A check mark in the box indicates the feature is enabled.
4. Click on
OK.
" NOTE The Z-Positioning taught height is independent of the Safe Z-Height. On systems
configured with the Fixed Height Pattern Recognition System, this feature is not used.