
Manual


Installation 23
Installing the Computer
CAUTION! Make sure all power sources are disconnected before performing this procedure.
" NOTE All materials are included in the accessories crate that accompanied your DispenseMate.
To install the Computer:
1. Locate the Computer and Monitor, remove all packaging material, and place it in the desired
location.
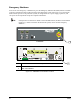
2. Connect the RS-232 cable (P/N 7200897) to the rear of the DispenseMate and to COM 1 on
the Computer. See Figure 3-1.
3. Connect the Monitor cable to the Monitor port and hand-tighten the thumbscrews.
4. Connect the keyboard and mouse to the Y-Cable and connect the Y-Cable to the MSE/KB
connection at the back of the Computer.
5. If the optional Automatic Pattern Recognition System is installed, connect the “Light Source”
cable (P/N 06-2215-01) and “Camera” cable (P/N 06-078-00) to the Computer. See Figure 3-1.
6. Plug the Computer power cable and the Monitor power cable into the facility outlet.
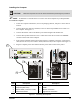
Item Description Item Description
1 DispenseMate (Rear View) 5 Mouse/Keyboard Connection
2 Computer (Rear View) 6 COM1
3 RS-232 Cable (connected to COM1) 7 Monitor Connection
4 Camera Connection 8 Light Source Connection
Figure 3-1 Connecting the Computer
8
7
1
2
3
4
6
5