
Instruction Manual


10 Running the VAPR Procedure
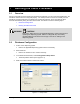
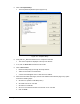
4. Click on Prompted Setup.
The Prompted Setup Window opens (Figure 2-6).
5. Verify that the "_Machine Offsets DJ Line" script file is selected.
The current script file is displayed at the top of the window. If not, click on Select File and
select it from the list.
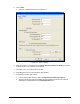
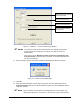
6. Click on Run to End.
Fluidmove will prompt you through the setup task list.
Tasks are executed in the order listed.
A check mark will appear next to a task when it is finished.
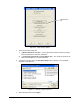
7. When the Vacuum Assisted Prime Window (Figure 2-7) opens, perform Steps 9-13 under
2.3.1.1 Fluidmove Production Window.
2.3.2 Manual Operation
2.3.2.1 Fluidmove Production Window
1. Install a clean valve with a new feed tube and fluid syringe onto the dispensing system.
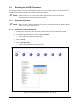
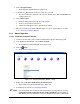
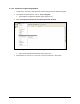
2. In the Fluidmove Main Window, click on Run a Program.
The Fluidmove Production Window opens (Figure 2-12).
3. Click on
Setup.
The Production Setup List opens.
Figure 2-12 Fluidmove Production Window - Setup
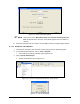
4. Double-click on DJ Series Fluid Priming Vacuum Assisted.
The Vacuum Assisted Prime Window opens (Figure 2-7)
5. Perform Steps 9-12 under 2.3.1 Automatic Operation.
NOTE If the desired task does not appear on the drop-down list, you may add it by selecting
Configuration>Setup Scripts>Production Setup List>Add File from the Fluidmove
Main Window. For more information, refer to the Fluidmove User Guide or Online Help.